Customer Service
In order to work with zipped files, they must be unzipped or extracted first. Windows has a built in program called Windows Compressed Folders which can do this for you. If you have installed a zip program, such as WinZip* or 7-Zip*, Windows Compressed Folders may not be easily available on your computer. If you follow the instructions below for Windows Compressed Folders, but a different program opens, you can still follow the instructions listed, and it should generally still work.
- Unzipping a file with Windows Compressed Folders
- Find the zipped file that you want to unzip in Windows Explorer. In this example, I'm showing cvs-eep-entrytool-v2.2.7.zip, in the folder C:data. Windows XP is shown here, but Windows Vista works in the same way:
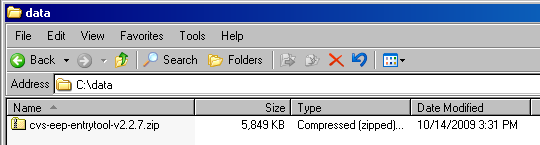
Note that the file extension is .zip for zipped file. - Next, double-click the zipped file. This opens up the zipped file so that you can see the files that are inside it. With the above analogy of a set of books on a bookshelf, you are now seeing the book spines on the shelf:

Notice the address bar now says that you are in a folder with a .zip extension and shows a zipped file icon as well. The file inside this zipped file is shown as a normal unzipped file. In this case, it's an .mdb file or Microsoft database. Do not double-click this file to open it when inside a zipped folder. That's like trying to read a book before taking it off the shelf.This step is the step that confuses a lot of people. This appears to be a normal folder on your computer, but in fact, you are within a single zipped file. - Single-click the file(s) and/or folder(s) you want to unzip. If you want to select all files and folders (even if there is only one) in the .zip file, press Ctrl-A on your keyboard:

Notice that the files are now selected. In the above screenshot, a blue background shows that a file is selected. The background for selected files could be a different color on your computer. - Now, copy the file(s) by pressing Ctrl-C on your keyboard.

- Then, click the "back" button to return to the previous folder:

- Now you are in the original folder, which is not a zipped file (in this case, C:data):
- Lastly, paste the file(s) into this folder by pressing Ctrl-V on your keyboard. This copies the files as unzipped files into the folder you are currently viewing:

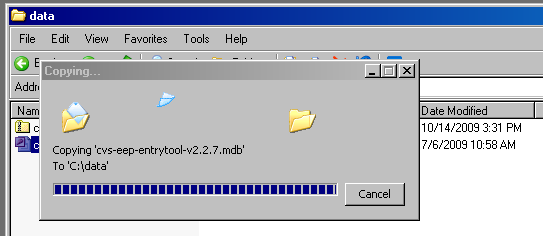
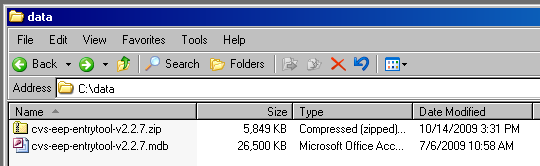
This may take a few minutes or longer for large files. - When the file has completed copying, both the .zip file and the unzipped file(s) are in the same folder. You can use the .zip file as a backup copy or delete it. You can now work with the unzipped files. In the above analogy, you have pulled book(s) off the shelf and can read them. Enjoy!
Spam filters are awesome, but sometimes can block legitimate email accidentally. Because you are not notified when the system blocks a message, it is not a bad idea to check your spam folder every so often to make sure nothing legitimate has been blocked. Here is how you can see what has been intercepted by the spam filters on your account:
- Log in to your web based email (if you are not sure how to do that click here - will open in a new window)
- On the left side, under the main InBox, there is a list of other folders that the email system uses
- When our server blocks a spam email message, it goes into a folder on the server called "Junk"
- To view what has been sent to that folder, simply click on it
- If any of the messages in that folder are not spam, please forward a copy to us (at support@your-web-guys.com) letting us know that it should not be filtered in the future
Compatibility mode was introduced in IE8 and was a useful tool to correctly view a website if it was not designed with the newer standards of IE8 in mind. Without it many websites would not load correctly. However, because any site that Your-Web-Guys build for you will always be up to date using the latest standards it can actually have the opposite effect if turned on when not needed. If your website is not loading properly in Internet Explorer, but is loading correctly in Fire Fox or Chrome or other browsers, you probably have accidentally turned on the compatibility mode feature in Internet Explorer. Here are a few ways to make sure it is turned off. If your site still does not load correctly and you are sure compatibility mode is turned off then please contact support so we can take a look at the problem.
Click/tap on the highlighted (blue) Compatibility View icon button. (See screenshot below)
NOTE: The webpage will now reload with Compatibility View turned off for it.
![]()
Contrary to popular belief, the Mail app in Windows 8 isn’t just a client for Hotmail/Windows Live Mail/Outlook; it can manage accounts from other common providers like Google, Yahoo!, AOL etc., as well as having the ability to synchronize any IMAP enabled client. Let’s take a look at how you can set up Windows 8 Mail app to your liking.
The reason most people fail to discover the support for other email services in the native Mail app is that you cannot add another account until you link your own Microsoft account with the client. Assuming that you haven’t set up Mail in Windows 8 at all yet, simply click the Live Tile on the Start Screen and you should see a screen like this:

If you already have a Microsoft account, sign-in here and let the application sync your Outlook mail or Windows Live Mail. Once that’s done, hit the Win key + I combination to pull up Settings for the Mail app. Click/tap Accounts, followed by Add New Account next to the + sign. A list of all the common providers will be presented, and all you need to do here is enter the login information to sync the new account with Windows 8 Mail app.

Special thanks to RedmondPie.com for this outstanding tutorial - click here for the full article
Google maps has changed their API access requirements. Now you must have billing set up before you can use the features that google maps provides for your website. This does not mean you will need to pay typically because when you enable billing, you get $200 free usage every month for Maps, Routes, or Places. Based on the millions of users using maps APIs today, most sites can continue to use Google Maps Platform for free with this credit. Here is how you set up the account:
- Part 1: set up your billing account
- go to https://cloud.google.com/maps-platform/?apis=maps
- click "get started"
- it may throw a popup asking you to enable billing for a project, if so click "create billing account" if not, continue with step 4
- you will now be asked for account information. select your country and agree to the terms of service
- set up your payment information. Do not select automatic billing as you probably wont need to actually be charged anything by their system. The payment info is just to reduce abuse (robots rarely have credit cards)
- answer the welcome questions: it doesnt really matter what you put in, then click continue
- if it asks how you want to protect your key click "maybe later"
- #didit your api and billing account is created
- Part 2: Give Your-Web-Guys access to the api settings
- in the api console, click on the navigation menu button in the upper left corner of your screen (looks like three horizontal lines)
- go to IAM & Admin
- click on "grant access" in the upper left above the title "permissions for project..."
- enter the following email into the new principals field
info@your-web-guys.com
- under assign roles select project > owner
- click save
- this will send an invitation to us so we can administrate your api for you.
Thats all you need to do! We will take it from there and make sure the api key is set up properly and is restricted from unauthorized use
Our client control panel enables our customers to login to their account 24 hours a day, 7 days a week. With this unique interface you can view past and current invoices as well as keep track of the payments you have made. Also you can submit support tickets any time day or night for changes you want made to your site or to request additional services. No more phone calls and emails which you never know if anyone gets. You get confirmation and information as soon as you interface with your client control panel
Current Clients Login
We accept just about everything. From cash to checks to money orders to credit cards, if you have it we will accept it. The last thing we want to do is make it difficult for you to pay us!
How do I make payments?
Most of our clients prefer to use our client control panel to make payments with their credit cards or paypal, but we can accept cash, checks or money orders at our Red Oak office through the mail or in person.
No problem at all. We can add just about any script or software plug-in you can find for your web site. Our servers have just about every back end program needed to run almost any script out there. There is a nominal one time fee depending upon which type of script you may need. See a list of the scripts we have worked with in the past and what fees are associated with them in our Idea Center.
What if I know I want something but not specifically what script it is?
Either use our industry leading idea center or we can research and find a program which will suit your needs to a "t". Many times you will be surfing the web and come across a great feature on a competitors site. Problem is you have no idea what the script is called or what kind of script it is for that matter. We know, we do it all the time. We will see what you have found and get you something similar for your site at no additional charge... just the one time fee for adding the script and we will be on the case.
Of course!
One of the most important things you can do for your online marketing efforts is to update your website on an ongoing basis. Search engines place a premium on updates and how often new content is added. To make this process easy, we typically integrate your website with a content management system or CMS. Our customized CMS is designed so that you can update it easily and without any "geek knowledge" of code or the like. It is set up so that all you have to do is type. Everything else; such as navigation links, design elements, and other minutiae are done for you... automatically. There are several tutorials on how to add content to your website in the CMS tutorials section of our FAQ page.
Sometimes though, there are changes that need to be made to your website that will take more than just typing. When that is the case, we are always there to make those updates for you. We never want you to be left out in the cold and scary world of the geeks. The good news is that with our CMS we can usually make changes and add new functionality without ever charging you an additional fee. It depends on the level of the addition though, so take a look at our Idea Center to see some of the options and which would be an additional fee.
How quickly do you make the changes I request?
There is almost always one of us online keeping an eye on the service requests admin so we will update you with when the changes will be made almost instantaneously. The speed of when the actual changes will be made will depend upon workload, day of the week, level of difficulty of the request, and other factors but usually they will be finished within 24 hours. You can follow the progress of any support tickets you create through your client control panel
We are conveniently located in Farmers Branch Texas, at the northwest corner of I635 and I35 E. Our physical address is below, or you can get turn by turn directions on our location page
2695 Villa Creek Dr
Suite 145d
Farmers Branch, TX 75234
Phone: (metro) 1-877-WEB-GUY-1
This is information on how to set up an email client such as Outlook, Thunderbird, a cell phone email app, or Apple Mail. Use this link if you would like to use a web browser based system.
For those of you who know how to set up an email account feel free to simply use the information below to do so. If you need more specific, step by step instructions they are further down. Of course [yourdomain] should be replaced with, whatever your domain is and .com should be changed if your domain isnt a .com (ie a .org or .biz or whatever it might be). Also if your name isnt Bill Johnston, you probably want to change it to your name 🙂
Server Information
- Incoming mail server (IMAP): mail.[yourdomain].com
- Outgoing mail server (SMTP): mail.[yourdomain].com (if this doesn't work click here for an alternative setting)
User Information
- Your Name: Bill Johnston
- E-mail Address: billjohnston@[yourdomain].com
Logon Information
- User Name: billjohnston@[yourdomain].com
- Password: [whatever you specified to us] click here to learn how to change your email password
Setting up Outlook / Outlook Express
Open outlook and on the tool bar at the top click on Tools>E-Mail Accounts. then follow these instructions:
- Select "add new email account" if it asks and click next
- server type select "IMAP" if it asks and click next
- enter the user information as specified above and click "Test Account Settings"
- thats it! if your configuration was correct the test will be successful - if there are any problems, feel free to submit a trouble ticket
Depending upon what isp (internet service provider) you have, the setting described in the email set up faq page for your SMTP (outgoing) mail server may not work. Some ISP's block 3rd party email servers for different reasons. If this is the case there are two options that my help solve the issue.
Option 1
Change the outgoing server port from 25 to 587. Port 25 specifically is what is being blocked usually so by using an alternate standard smtp port it should solve the problem.
Here's How
Open outlook and on the tool bar at the top click on Tools>E-Mail Accounts. then follow these instructions:
- Select "view or change existing email accounts" if it asks and click next
- Leave all the settings the same except for the SMTP (outgoing) Mail server port.
- Change it from port 25 to 587
- Click "Test Account Settings"
- thats it! if your configuration was correct the test will be successful
Option 2
Change the SMTP server from mail.[yourdomain].com to mail.[yourisp].com. In other words, if your isp is Comcast then you would change your smtp server to mail.comcast.net.
Here's How
Open outlook and on the tool bar at the top click on Tools>E-Mail Accounts. then follow these instructions:
- Select "view or change existing email accounts" if it asks and click next
- Leave all the settings the same except for the SMTP (outgoing) Mail server.
- Change it to mail.[yourisp].com
- Click "Test Account Settings"
- thats it! if your configuration was correct the test will be successful
- if there are any problems, feel free to submit a trouble ticket
How to do it:
- Open up your favorite internet browser
- Type the following URL into the address bar:
- http://www.[yourdomain].com/mail
- Make sure you replace [yourdomain].com with your actual domain name (i.e. your-web-guys.com)
- Enter your login information as shown below.
- Name: type your full email address (i.e. rkinney@your-web-guys.com).
- Password: type whatever your password is.
- That's it! you should be able to send receive and view any emails which are still on the sever.
if there are any problems, feel free to submit a trouble ticket
Browsers that support JavaScript allow you to take advantage of advanced features of websites created by Your-Web-Guys, including flash menus for easy site navigation. If you have problems viewing the flash menus, you probably have JavaScript turned off in your browser, or your browser doesn´t support JavaScript. If your browser is listed below, it supports JavaScript. If you use one of these browsers but still cannot see JavaScript features, JavaScript may be turned off in your browser.To turn on JavaScript, follow the directions below:
- Microsoft® Internet Explorer® 6.x and 7.x (Windows®)
- Select Internet Options from the Tools menu or, for Version 7, from Tools in the upper right portion of your screen.
- Click the Security tab.
- Click Custom level... in Security level for this zone.
- Scroll down to Scripting, near the bottom of the list.
- Under Active scripting, choose Enable.
- Click OK to leave Security Settings. Click OK to leave Internet Options.
- Mozilla® Firefox® 3.x (Windows)
- Select Options... from the Tools drop-down menu.
- Select the Content section from the options at the top of the pop-up page.
- Check the "Block pop-up windows," "Load images automatically," "Enable JavaScript" and "Enable Java" boxes.
- Click OK.
- Google Crome
- Select Customize and control Google Chrome (wrench Icon) to the right of the address bar.
- From the drop-down menu, select Options.
- Select the Under the Hood tab at the top of the window.
- Under the Privacy heading, select the Content settings button.
- On the left, under the features heading, select JavaScript.
- Select the Allow all sites to run JavaScript radio button.
- Finally, close both preference windows, and refresh the browser.
- SafariTM 3.x (Macintosh®)
- Select Preferences... from the Safari drop-down menu.
- Select the Security section from the options at the top of the pop-up page.
- Under "Web Content," check the "Enable plug-ins," "Enable Java" and "Enable JavaScript" boxes.
- Close the Security window.
Sometimes an internet browser will store or "cache" web pages so that they will load faster the next time you visit them. Many times your website will not show the changes that Your-Web-Guys have made because the browser you use will display the old version of a page from its cache rather than the new updated version of it. To solve this problem you should delete your browser cache. Click on name of the browser you are using from the list below to be taken to a page with instructions on how to do this.
At Your-Web-Guys we are always striving to make the small business owner's life easier. Smart businesses know that if you can use someone else's money to build your business you should take advantage of that. When we looked at the initial setup/design costs for a website we noticed that many small business owners, while they could afford a $4 to $5 thousand dollar expense, they had much better things to spend it on than a website design. That's why we developed our industry leading $0 Setup/Design program. We build or redesign the website for nothing out of pocket and simply spread those costs out over a period of time with approved credit.
Everything is included
Just like our traditional agreement, everything is included in the monthly fee. That includes hosting and maintenance, support and training, updates and security patches, automatic backups and restorations, domain registration and renewal, security certificate and renewals, unlimited email addresses (within reason), and basically everything you need to have your website online and working properly.
Agreement Terms
The initial term of the agreement is 24 months and will automatically renew for another 24 months. At the end of each term you own your site and can take it to another provider if you choose, no questions asked. However, if the agreement renews for another 24 month term we will redesign your website at no additional cost to you. That's just our way of saying "thank you for letting us be Your-Web-Guys"
At a glance:
For a quick reference of the highlights in the agreement we put together this bullet list. You can see the specific verbiage by downloading a pdf version of our agreement here.
- Domain registration in your name
- Unlimited Pages/Products
- All basic scripting needed
- Any and all photography needed
- Digitization/creation of your company logo
- Search Engine optimization
- Customized graphics
- 24 month term (WAC)
- You own all work done by us at the end of the term
- Complete redesign at renewal
Click here to schedule instantly
- Log into the web mail program for your domain:
http://[your-domain].com/mail (change [your-domain] to your domain) - Then click on the support icon in the upper right hand corner marked "settings"
- Click the button marked "password" on the menu on the right side of the screen once the settings page loads.
- enter your old password and then your new password twice and click "save"
- That's it, your new password has been activated.
In order to work with zipped files, they must be unzipped or extracted first. Windows has a built in program called Windows Compressed Folders which can do this for you. If you have installed a zip program, such as WinZip or 7-Zip, Windows Compressed Folders may not be easily available on your computer. If you follow the instructions below for Windows Compressed Folders, but a different program opens, you can still follow the instructions listed, and it should generally still work.
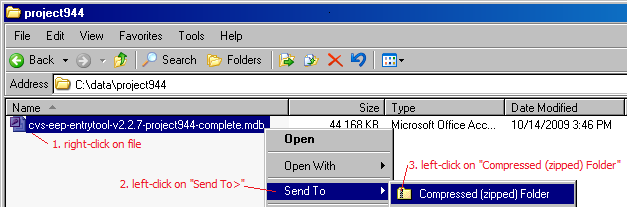
- To zip a file, find the file in Windows Explorer (file browser).
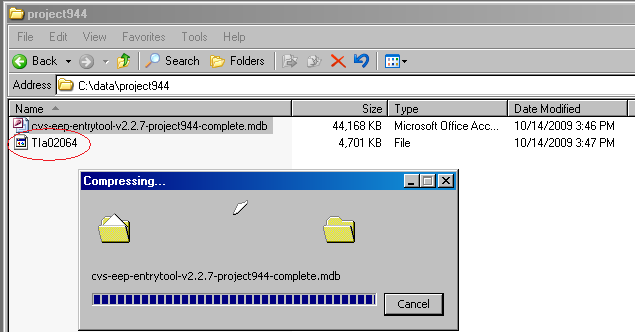
- Right-click on the file, left-click on Send To > , then left-click on Compressed (Zipped) Folder:
- Windows creates a temporary file (highlighted letters) and may show a "Compressing..." progress box:
- When Windows finishes compression, a new .zip file has been created in the same folder as your unzipped file, with the same name except with a .zip extension:
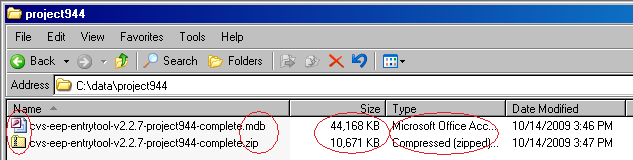
Note that in most cases, the file size will be much smaller. Some files can't be compressed much, such as .jpg pictures. Others files, such as text and database files, compress to a small fraction of the size of the uncompressed file.
What if the layout I want has flash buttons or a flash intro on it?
Update
Flash has completely gone the way of the Dodo bird. You certainly dont want us to do anything with it. If you still have flash on your website, you need to update it asap. Schedule a meeting with one of Your-Web-Guys using
 The only person who can speak with authority on your business and products or services is you. Because of that, the short answer is no we cannot create the actual verbiage and text content for your website. However we can give you some tips and tricks which will help you get started. If all else fails we do work with several copywriters and content experts who specialize in providing crisp, clean, search engine optimized and well thought out verbiage with only a little input from you to get them started. They can get a bit pricy, but when we have had clients opt for this in the past they have felt it very much worth the extra cost.
Content Creation Tips:
- Start with major topics
Typically there are five pages which make up your average website. They are listed below, but if you have different needs they are not set in stone. Use these pages as major topics and start writing your content from that point.- Home page - consists of a welcome message or possibly a mission statement
- About us - information about the company and/or the people who work there
- Services/Products - self explanatory, but dont skimp on this one, the more text the better... we will break it down into more pages if it gets too long.
- Location - consists of an embedded dynamic google map that will give turn by turn directions to your location from their front door.
- Contact Us - usually a form for folks to fill out with specific information you would like to collect from them. Also includes phone numbers and other means of contact
- Write how you speak
When you are speaking to someone about your product or service you have scripts that you more or less go by each time. Write them down and you have a great starting point for your web content. - The more the better
When it comes to websites and specifically seo content is king. A picture may be worth a thousand words to a human, but to a search engine spider a picture is just a bunch of pixels. Only a thousand words are worth a thousand words in the search engine world. If it gets too wordy we will break it down and make more pages out of your content. - Use your competitors' content as a jumping off point
Although imitation is the most sincere form of flattery, we don't want to copy or plagiarize anyone (if we get a cease and desist order we will yank the content without question). However, piggy-backing off of others' ideas is not only a good way to get started, it is also a great way to improve upon what they have already started. - Always think F.A.B.
For each of your products and services use the F.A.B. method. It stands for Feature Advantage Benefit. The feature is whatever you want to highlight for that product or service. The advantage is how that feature is not only exclusive to your company, but also how it can directly give them an advantage over their competitors. The Benefit is how it will make them money. Using this time honored approach to selling your products and services will help flesh out your general ideas of what you want to have your website exhibit.
Make Us Your-Web-Guys Today
 Step 1: Tell us about your business
My company...
