Photo and Video
While your products might look fine on the shelf at your store, they probably aren't quite ready for their close up. Price tags, fingerprints, packaging, and other minor blemishes can make a product look less than it can look through the camera lens. Follow these guidelines to make sure you get the best images of your products:
- Remove all packaging including any wrapping or other padding unless the packaging is what you want shot. Keep in mind that the packaging is rarely something you want shot. Please do not expect us to unpackage and then repackage your products. We don't have the knowledge of your products like you do to do them justice.
- Remove any price tags or better yet, if possible, provide products which have not ever had price tags affixed to them as the adhesive can cause a blemish in the image.
- While we will do limited prep on small products and food items large products such as automobiles or industrial equipment will need to be cleaned before your session.

Bring any background items you would like included
- Any imperfections in the product will be amplified by the camera. Make sure the products you provide to be shot are as perfect as possible to get the best results.
- Make sure to provide any background items you would like in the shots unless a plain background known as high-key is preferred. For example, the fruit and other dishes in the background if this image. An example of a high-key image is below.


Example of High-Key product photography
A website consists of several elements. One of the most important one is the photographs that are used in conjunction with the other content on the site. If we did not include photography in our design packages then we would be neglecting a huge part of your web design. Because of that we provide photography in two forms.
- Custom photo shoots of you, your people, your location(s), and your products
- Stock Photography of things that go with your content
If you don't need any specific photographs to complete your website (such as head shots or product/location shots) then stock photography may be the best bet for you. Any stock photos you choose from our Stock Photo Center will be included in the cost of whichever package you choose. If you find an image through a different provider then you may be required to purchase it directly for us to use, it depends on the image.
More than anything else... relax. Think about what parts of your website need photography and what specifically you want shot. Schedule the shoot by sending a request to photography@your-web-guys.com and we will work with you on the best time to do it.
Here are some tips for different types of photos we might do for you:
- Head-shots or group shots of your employees: take a look at this blog post for some good information.
- Shots of your location/building : make sure the landscaping is done and the exterior is power washed before the shoot. Also make sure the parking lot, if visible, looks the way you would want it to. If you want no cars in front of your building, make sure you block off the spots before we get there to ensure a quick turn around.
- Product shots: just drop them off to us and we will take care of everything - you don't have to worry about a thing.
- Photography at an event to put on your site: send an email to photography@your-web-guys.com to make sure we get it scheduled.
Search Engines
Once you have created your web page or your blog post in our CMS it is time to optimize it for search engine traffic. If you have already determined what keyword/phrase you want to focus on then you are ready to use this tutorial. If you have not, please click on the links in the previous statements to get caught up then come back here.
The thing to remember overall is that google (and all search engines) like repetition, but not copy and pasting. This is referred to as keyword density. There are lots of different opinions on what specific percentage you should use, but none are considered best practices and there is lots of debate as to which is the correct number. We believe that when there is no consensus, you should use a rule of thumb.
The best rule of thumb would be to phrase your content in a way that might seem odd when read. In other words, if you read your content and you think to yourself "if i hear dallas dentist office one more time i am going to loose my mind", then you are using it too often. If you read your content and you don't notice the keywords at all, then you are using it too little. If you read your content and you think to yourself "that is an odd way to write that" then odds are it is perfect.
In addition to that rule of thumb you also have the opportunity to add some keyword density through media on the page and the metadata contained within. Below is how our system allows you to manipulate the metadata throughout your site with a simple recipe.
In the SEO Options panel, just below the main content area of the edit post/page dialog on your administrative back end enter the following:
- in the first field, enter the keyword or phrase that you are targeting for this update. Click here for help on how to determine which keyword/phrase to use
i.e. Dallas dentist office - h1 field - write a sentence with the keyword or phrase in it.
i.e. Dentists office in the Dallas Area - Description field - write another sentence with the keyword/phrase in it again, but rearranged this time.
i.e. Great Dentist in an office in dallas - keywords field - this field is not really needed anymore. Most search engines dont look at this meta tag because it was so badly abused in the past. However, that could change at any moment so it is not a bad idea to use it. It just probably wont make a difference any time soon.
- seoblockquote field - Here you should enter a paragraph with your keyword/phrase in it a couple of times. Remember to rearrange the words to make them different than before, but just a couple of sentences should do the trick
Once you have all that in place, your content is ready to be published. Now all you need to do is figure out when publication would work best, here is what we suggest.
Before you even start writing a web page or your blog post in our CMS, you need to determine which keyphrase or keyword you want to focus on for search engine traffic. Once you have determined your keyword/phrase, you can create your page or post as normal, then optimize the content and the media to match. Here is how to determine which keyword or phrase you should use:
Option 1, ask google
One of the great things is that if you want to know how to get more attention from google, you just have to google it. They will tell you everything you need to know to get traffic from them. One of the greatest tools they provide is the keyword suggestion tool in google adwords. You will need an adwords account, but creating one is easy and free. Even though they will try to convince you to purchase pay per click packages, we advise you not to. Just use the tool instead.
- login to adwords by clicking the link above
- if you don't get to the keyword planner tool initially, click on tools in the navigation bar and select keyword planner from the drop down menu
- under [Find new keywords and get search volume data] click on the first option titled "Search for new keywords using a phrase, website or category"
- this will open up a form where you can enter different information. These fields are pretty self explanatory and have help icons you can click on for more detailed information so we will not go over them all here. Fill out the form with what you want to determine and click [get ideas]
- The new page will show lots of different options and ways to drill down to find the information you want, but if it gets overwhelming, just let us know and we will walk you through it.
- The important thing to look at is the keyword ideas table in the middle of the page. The table is like a spreadsheet with the following columns:
- keyword
- ave. monthly searches
- competition
- suggested bid
- ad impr. share
- add to campaign
- the first three columns are what you are after. Find a keyword that is high in monthly searches, but low in competition. That is the keyword you want to use for your content.
They change this tool quite a bit so these instructions might not be correct when you read them. If that is the case, let us know in a support ticket and we will walk you through it personally.
Option 2, ask google... in a different way
All of the sites we build include google analytics tracking. You can use this tool to find what keywords your site is getting traffic from as a starting point before using the adwords tool above. You should also use this tool to see what results your efforts have brought so you can adjust your focus accordingly in the future. Again, this tool is very robust and powerful to the point that it is hard to handle if you aren't used to working with it. We are, so don't hesitate to ask us to help you navigate the use to get the information you need.
- login to analytics here
- click on the all website data link under your company name (if you don't see statistics initially)
- in the left menu, click aquisition, then search console, then queries
- this will show you what keyphrase was used to find your site in the time period you indicated.
The first row is always going to be (not set) because as privacy concerns have increased, there are instances where google will simply not log what keyphrase was used to find your site. Typically though, that is just an amalgam of the other keywords below so simply ignore it.
Because keyword density is so important to get right (you dont want too much but you also dont want too little) you need to use every opportunity to add keywords without looking spammy. One great way to do that is through media on your post or page. Hopefully you have already reviewed, or are familiar with adding and editing media to your content. In addition to the normal way of adding an image, you want to follow these additional steps to ensure your image(s) are correctly optimized with the keyword you have determined for your update and that you have optimized the update for.
Step one, find an image that matches your content.
Simply doing a search in google images for the keyword you are using and downloading someone else's image to use isn't a great idea, although it probably wont be a big issue if you decide to (we just didn't tell you to do it). The better idea is to find a royalty free stock photography supplier where you can find the image you need and purchase the rights to it pretty inexpensively. We recommend 123rf.com as the smallest image size they provide, which is all you need for this kind of thing, is only about a dollar.
Step two, adding it to your content
The normal process of uploading an image to be used in the update is fine, just dont complete the process until you have finished the next step. Select a spot near the top or even multiple places for additional images if your content is long enough.
Step three, optimizing it to suit your keyword
once you have uploaded the image, make the following modifications in the attachment details panel on the right side of your screen:
- Title: Edit this to have your keyphrase/word in it. Very few people will see this content, but googlebot certainly will.
i.e. Dental Waiting Room in our Dallas Office - Caption: This will show up under the image on the web page you are creating. Keep it readable, but try to include the keyphrase again in another order
i.e. View of our Dallas office waiting room in our dental practice. - Alt Text: This is for things that don't have sight. I say things, because googlebot and other search engine robots can't see. All they can do is gather data and a bunch of pixels don't look like a picture to a robot... they are just a bunch of pixels. So the alt tag is a great place to add another instance of keywords into your update. Just another sentence with the phrase in it rearranged just like before. This one can be seen by people, but not as obviously as the caption.
i.e. Image of dallas dentist office waiting room
Now, insert the image just like you would normally.
Because search engines need your content more than anything else, the various algorithms that they use all have one thing in common... they all want new content added on an ongoing basis. To make sure you provide the content they want in a routine fashion we suggest two things;
#1 create an editorial calendar
Having a plan to target specific keywords/phrases on a regular basis is key. Using one of the templates below, you can create an editorial calendar that will help keep your plan organized and on target. Your editorial calendar should include simple information about each of these projects:
- Title or description of the content
- Links to supporting documents, like content briefs
- Author or writer
- Deadline
- Channels you will promote it on (don't forget, search engine optimization goes hand in glove with social media)
The following is a very basic template of an editorial calendar which we got from this article on the Hootsuite Blog. You should add columns or rows as required.
#2 Pre Post your updates
Using your editorial calendar does not have to be a day to day thing. You can create it, then schedule the updates you write to be published automatically on a future date through your website. If you have opted to have our social media setup done as well, then your social media platforms will also get the update over time. Here is how you do it:
- Create and optimize a blog post as usual, but dont click on the blue publish button
- just above the blue publish button you will see a calendar icon with the words [Publish immediately] and an edit link next to it. Click on the edit link
- this will reveal date and time fields that you can edit to your liking. Set the date into the future and click okay
- that will change the publish button into a schedule button. Click on it and your post will go out automatically at the time and date you specified.
You can create and schedule your entire month, quarter or even year of updates all at one time using this technique. Then you simply do what you do best... build your business while your website published updates to get the search engines attention.
As you probably know, most people find companies through search engines such as Google, Bing, and Yahoo. Most customers only search through the first or second page of results for any specific search term. The good news is that getting listed on those engines is completely free. The bad news is that that means everyone is competing for those top ten to twenty spots for any given search term. Search engine optimization (or SEO) is a complex and constantly changing set of techniques which are designed, but not guaranteed, to get your web pages into those lucrative top 20 listings. All of our websites are optimized for keywords and phrases relative to your business which are popular at the time of construction.
Why would I want to re-optimize?
As was stated above, the process of SEO is a constantly changing thing. Search engines change the way they sort the search and new sites are constantly coming online which can out rank you. Add to that the fact that different search terms relating to your business come into and out of vogue for surfers constantly and you may want to have us re-optimize your site every few months.
Can I pay for my site to be listed higher in search engines?
Absolutely... but you cant pay us. Most search engines will allow companies to pay for placement on specific search terms or phrases. This is called pay per click or PPC placement. Basically you bid on the specific search phrase or word you want to be placed on and for each person who clicks your link you pay that amount. You are not guaranteed any new clients or income from the process but you can expect a pretty good return on the investment. We can manage that process for you for an additional $45.95 a month if you don't want to be bothered with it.
Part of it is SEO while the other is getting traffic from other sources. One of the biggest reasons to get a website for your business is to gain new clients and open up new demographics. One of the ways to do this is through online market research - finding similar sites to trade links with, getting listed on directories which cater to surfers who are looking for services you offer, etc... We do all that for you at no additional charge. The other way you can gain grater market share is to place high in search engines for popular terms, which is known as search engine optimization or SEO. We research various search engines to see what terms are the most searched for relating to your business and optimize your pages to rank highly when anyone searches for them. The only time we charge for this kind of SEO is if you want to re-optimize your site with new terms or new techniques. We will even tell you if we think that you would benefit from our re-optimizing before we charge you for it.
Of course if you need more help with your search engine optimization then we can add content to your site monthly that is specifically designed to get you more traffic from search engines. Take a look at our Search Engine Optimization Services for more details
Customer Service
In order to work with zipped files, they must be unzipped or extracted first. Windows has a built in program called Windows Compressed Folders which can do this for you. If you have installed a zip program, such as WinZip* or 7-Zip*, Windows Compressed Folders may not be easily available on your computer. If you follow the instructions below for Windows Compressed Folders, but a different program opens, you can still follow the instructions listed, and it should generally still work.
- Unzipping a file with Windows Compressed Folders
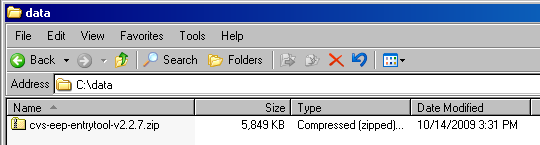
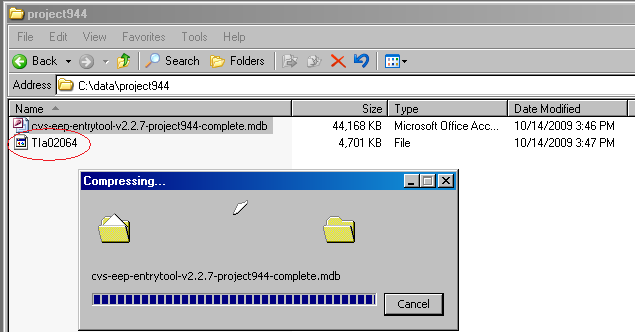
- Find the zipped file that you want to unzip in Windows Explorer. In this example, I'm showing cvs-eep-entrytool-v2.2.7.zip, in the folder C:data. Windows XP is shown here, but Windows Vista works in the same way:
Note that the file extension is .zip for zipped file. - Next, double-click the zipped file. This opens up the zipped file so that you can see the files that are inside it. With the above analogy of a set of books on a bookshelf, you are now seeing the book spines on the shelf:

Notice the address bar now says that you are in a folder with a .zip extension and shows a zipped file icon as well. The file inside this zipped file is shown as a normal unzipped file. In this case, it's an .mdb file or Microsoft database. Do not double-click this file to open it when inside a zipped folder. That's like trying to read a book before taking it off the shelf.This step is the step that confuses a lot of people. This appears to be a normal folder on your computer, but in fact, you are within a single zipped file. - Single-click the file(s) and/or folder(s) you want to unzip. If you want to select all files and folders (even if there is only one) in the .zip file, press Ctrl-A on your keyboard:

Notice that the files are now selected. In the above screenshot, a blue background shows that a file is selected. The background for selected files could be a different color on your computer. - Now, copy the file(s) by pressing Ctrl-C on your keyboard.

- Then, click the "back" button to return to the previous folder:

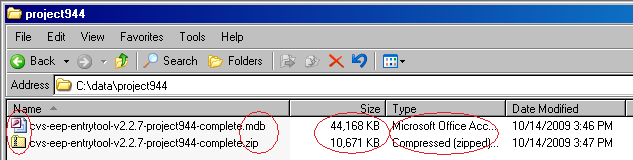
- Now you are in the original folder, which is not a zipped file (in this case, C:data):
- Lastly, paste the file(s) into this folder by pressing Ctrl-V on your keyboard. This copies the files as unzipped files into the folder you are currently viewing:

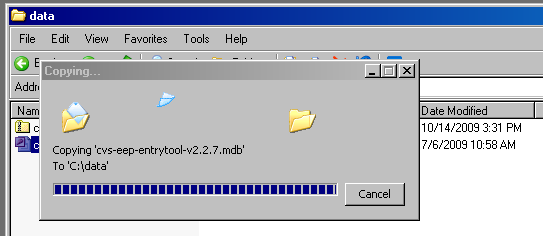
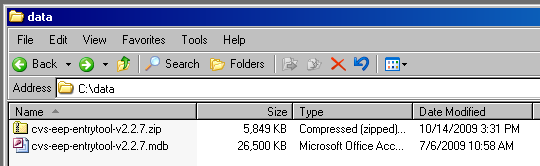
This may take a few minutes or longer for large files. - When the file has completed copying, both the .zip file and the unzipped file(s) are in the same folder. You can use the .zip file as a backup copy or delete it. You can now work with the unzipped files. In the above analogy, you have pulled book(s) off the shelf and can read them. Enjoy!
Spam filters are awesome, but sometimes can block legitimate email accidentally. Because you are not notified when the system blocks a message, it is not a bad idea to check your spam folder every so often to make sure nothing legitimate has been blocked. Here is how you can see what has been intercepted by the spam filters on your account:
- Log in to your web based email (if you are not sure how to do that click here - will open in a new window)
- On the left side, under the main InBox, there is a list of other folders that the email system uses
- When our server blocks a spam email message, it goes into a folder on the server called "Junk"
- To view what has been sent to that folder, simply click on it
- If any of the messages in that folder are not spam, please forward a copy to us (at support@your-web-guys.com) letting us know that it should not be filtered in the future
Compatibility mode was introduced in IE8 and was a useful tool to correctly view a website if it was not designed with the newer standards of IE8 in mind. Without it many websites would not load correctly. However, because any site that Your-Web-Guys build for you will always be up to date using the latest standards it can actually have the opposite effect if turned on when not needed. If your website is not loading properly in Internet Explorer, but is loading correctly in Fire Fox or Chrome or other browsers, you probably have accidentally turned on the compatibility mode feature in Internet Explorer. Here are a few ways to make sure it is turned off. If your site still does not load correctly and you are sure compatibility mode is turned off then please contact support so we can take a look at the problem.
Click/tap on the highlighted (blue) Compatibility View icon button. (See screenshot below)
NOTE: The webpage will now reload with Compatibility View turned off for it.
![]()
Contrary to popular belief, the Mail app in Windows 8 isn’t just a client for Hotmail/Windows Live Mail/Outlook; it can manage accounts from other common providers like Google, Yahoo!, AOL etc., as well as having the ability to synchronize any IMAP enabled client. Let’s take a look at how you can set up Windows 8 Mail app to your liking.
The reason most people fail to discover the support for other email services in the native Mail app is that you cannot add another account until you link your own Microsoft account with the client. Assuming that you haven’t set up Mail in Windows 8 at all yet, simply click the Live Tile on the Start Screen and you should see a screen like this:

If you already have a Microsoft account, sign-in here and let the application sync your Outlook mail or Windows Live Mail. Once that’s done, hit the Win key + I combination to pull up Settings for the Mail app. Click/tap Accounts, followed by Add New Account next to the + sign. A list of all the common providers will be presented, and all you need to do here is enter the login information to sync the new account with Windows 8 Mail app.

Special thanks to RedmondPie.com for this outstanding tutorial - click here for the full article
Google maps has changed their API access requirements. Now you must have billing set up before you can use the features that google maps provides for your website. This does not mean you will need to pay typically because when you enable billing, you get $200 free usage every month for Maps, Routes, or Places. Based on the millions of users using maps APIs today, most sites can continue to use Google Maps Platform for free with this credit. Here is how you set up the account:
- Part 1: set up your billing account
- go to https://cloud.google.com/maps-platform/?apis=maps
- click "get started"
- it may throw a popup asking you to enable billing for a project, if so click "create billing account" if not, continue with step 4
- you will now be asked for account information. select your country and agree to the terms of service
- set up your payment information. Do not select automatic billing as you probably wont need to actually be charged anything by their system. The payment info is just to reduce abuse (robots rarely have credit cards)
- answer the welcome questions: it doesnt really matter what you put in, then click continue
- if it asks how you want to protect your key click "maybe later"
- #didit your api and billing account is created
- Part 2: Give Your-Web-Guys access to the api settings
- in the api console, click on the navigation menu button in the upper left corner of your screen (looks like three horizontal lines)
- go to IAM & Admin
- click on "grant access" in the upper left above the title "permissions for project..."
- enter the following email into the new principals field
info@your-web-guys.com
- under assign roles select project > owner
- click save
- this will send an invitation to us so we can administrate your api for you.
Thats all you need to do! We will take it from there and make sure the api key is set up properly and is restricted from unauthorized use
Our client control panel enables our customers to login to their account 24 hours a day, 7 days a week. With this unique interface you can view past and current invoices as well as keep track of the payments you have made. Also you can submit support tickets any time day or night for changes you want made to your site or to request additional services. No more phone calls and emails which you never know if anyone gets. You get confirmation and information as soon as you interface with your client control panel
Current Clients Login
We accept just about everything. From cash to checks to money orders to credit cards, if you have it we will accept it. The last thing we want to do is make it difficult for you to pay us!
How do I make payments?
Most of our clients prefer to use our client control panel to make payments with their credit cards or paypal, but we can accept cash, checks or money orders at our Red Oak office through the mail or in person.
No problem at all. We can add just about any script or software plug-in you can find for your web site. Our servers have just about every back end program needed to run almost any script out there. There is a nominal one time fee depending upon which type of script you may need. See a list of the scripts we have worked with in the past and what fees are associated with them in our Idea Center.
What if I know I want something but not specifically what script it is?
Either use our industry leading idea center or we can research and find a program which will suit your needs to a "t". Many times you will be surfing the web and come across a great feature on a competitors site. Problem is you have no idea what the script is called or what kind of script it is for that matter. We know, we do it all the time. We will see what you have found and get you something similar for your site at no additional charge... just the one time fee for adding the script and we will be on the case.
Of course!
One of the most important things you can do for your online marketing efforts is to update your website on an ongoing basis. Search engines place a premium on updates and how often new content is added. To make this process easy, we typically integrate your website with a content management system or CMS. Our customized CMS is designed so that you can update it easily and without any "geek knowledge" of code or the like. It is set up so that all you have to do is type. Everything else; such as navigation links, design elements, and other minutiae are done for you... automatically. There are several tutorials on how to add content to your website in the CMS tutorials section of our FAQ page.
Sometimes though, there are changes that need to be made to your website that will take more than just typing. When that is the case, we are always there to make those updates for you. We never want you to be left out in the cold and scary world of the geeks. The good news is that with our CMS we can usually make changes and add new functionality without ever charging you an additional fee. It depends on the level of the addition though, so take a look at our Idea Center to see some of the options and which would be an additional fee.
How quickly do you make the changes I request?
There is almost always one of us online keeping an eye on the service requests admin so we will update you with when the changes will be made almost instantaneously. The speed of when the actual changes will be made will depend upon workload, day of the week, level of difficulty of the request, and other factors but usually they will be finished within 24 hours. You can follow the progress of any support tickets you create through your client control panel
We are conveniently located in Farmers Branch Texas, at the northwest corner of I635 and I35 E. Our physical address is below, or you can get turn by turn directions on our location page
2695 Villa Creek Dr
Suite 145d
Farmers Branch, TX 75234
Phone: (metro) 1-877-WEB-GUY-1
This is information on how to set up an email client such as Outlook, Thunderbird, a cell phone email app, or Apple Mail. Use this link if you would like to use a web browser based system.
For those of you who know how to set up an email account feel free to simply use the information below to do so. If you need more specific, step by step instructions they are further down. Of course [yourdomain] should be replaced with, whatever your domain is and .com should be changed if your domain isnt a .com (ie a .org or .biz or whatever it might be). Also if your name isnt Bill Johnston, you probably want to change it to your name 🙂
Server Information
- Incoming mail server (IMAP): mail.[yourdomain].com
- Outgoing mail server (SMTP): mail.[yourdomain].com (if this doesn't work click here for an alternative setting)
User Information
- Your Name: Bill Johnston
- E-mail Address: billjohnston@[yourdomain].com
Logon Information
- User Name: billjohnston@[yourdomain].com
- Password: [whatever you specified to us] click here to learn how to change your email password
Setting up Outlook / Outlook Express
Open outlook and on the tool bar at the top click on Tools>E-Mail Accounts. then follow these instructions:
- Select "add new email account" if it asks and click next
- server type select "IMAP" if it asks and click next
- enter the user information as specified above and click "Test Account Settings"
- thats it! if your configuration was correct the test will be successful - if there are any problems, feel free to submit a trouble ticket
Depending upon what isp (internet service provider) you have, the setting described in the email set up faq page for your SMTP (outgoing) mail server may not work. Some ISP's block 3rd party email servers for different reasons. If this is the case there are two options that my help solve the issue.
Option 1
Change the outgoing server port from 25 to 587. Port 25 specifically is what is being blocked usually so by using an alternate standard smtp port it should solve the problem.
Here's How
Open outlook and on the tool bar at the top click on Tools>E-Mail Accounts. then follow these instructions:
- Select "view or change existing email accounts" if it asks and click next
- Leave all the settings the same except for the SMTP (outgoing) Mail server port.
- Change it from port 25 to 587
- Click "Test Account Settings"
- thats it! if your configuration was correct the test will be successful
Option 2
Change the SMTP server from mail.[yourdomain].com to mail.[yourisp].com. In other words, if your isp is Comcast then you would change your smtp server to mail.comcast.net.
Here's How
Open outlook and on the tool bar at the top click on Tools>E-Mail Accounts. then follow these instructions:
- Select "view or change existing email accounts" if it asks and click next
- Leave all the settings the same except for the SMTP (outgoing) Mail server.
- Change it to mail.[yourisp].com
- Click "Test Account Settings"
- thats it! if your configuration was correct the test will be successful
- if there are any problems, feel free to submit a trouble ticket
How to do it:
- Open up your favorite internet browser
- Type the following URL into the address bar:
- http://www.[yourdomain].com/mail
- Make sure you replace [yourdomain].com with your actual domain name (i.e. your-web-guys.com)
- Enter your login information as shown below.
- Name: type your full email address (i.e. rkinney@your-web-guys.com).
- Password: type whatever your password is.
- That's it! you should be able to send receive and view any emails which are still on the sever.
if there are any problems, feel free to submit a trouble ticket
Browsers that support JavaScript allow you to take advantage of advanced features of websites created by Your-Web-Guys, including flash menus for easy site navigation. If you have problems viewing the flash menus, you probably have JavaScript turned off in your browser, or your browser doesn´t support JavaScript. If your browser is listed below, it supports JavaScript. If you use one of these browsers but still cannot see JavaScript features, JavaScript may be turned off in your browser.To turn on JavaScript, follow the directions below:
- Microsoft® Internet Explorer® 6.x and 7.x (Windows®)
- Select Internet Options from the Tools menu or, for Version 7, from Tools in the upper right portion of your screen.
- Click the Security tab.
- Click Custom level... in Security level for this zone.
- Scroll down to Scripting, near the bottom of the list.
- Under Active scripting, choose Enable.
- Click OK to leave Security Settings. Click OK to leave Internet Options.
- Mozilla® Firefox® 3.x (Windows)
- Select Options... from the Tools drop-down menu.
- Select the Content section from the options at the top of the pop-up page.
- Check the "Block pop-up windows," "Load images automatically," "Enable JavaScript" and "Enable Java" boxes.
- Click OK.
- Google Crome
- Select Customize and control Google Chrome (wrench Icon) to the right of the address bar.
- From the drop-down menu, select Options.
- Select the Under the Hood tab at the top of the window.
- Under the Privacy heading, select the Content settings button.
- On the left, under the features heading, select JavaScript.
- Select the Allow all sites to run JavaScript radio button.
- Finally, close both preference windows, and refresh the browser.
- SafariTM 3.x (Macintosh®)
- Select Preferences... from the Safari drop-down menu.
- Select the Security section from the options at the top of the pop-up page.
- Under "Web Content," check the "Enable plug-ins," "Enable Java" and "Enable JavaScript" boxes.
- Close the Security window.
Sometimes an internet browser will store or "cache" web pages so that they will load faster the next time you visit them. Many times your website will not show the changes that Your-Web-Guys have made because the browser you use will display the old version of a page from its cache rather than the new updated version of it. To solve this problem you should delete your browser cache. Click on name of the browser you are using from the list below to be taken to a page with instructions on how to do this.
At Your-Web-Guys we are always striving to make the small business owner's life easier. Smart businesses know that if you can use someone else's money to build your business you should take advantage of that. When we looked at the initial setup/design costs for a website we noticed that many small business owners, while they could afford a $4 to $5 thousand dollar expense, they had much better things to spend it on than a website design. That's why we developed our industry leading $0 Setup/Design program. We build or redesign the website for nothing out of pocket and simply spread those costs out over a period of time with approved credit.
Everything is included
Just like our traditional agreement, everything is included in the monthly fee. That includes hosting and maintenance, support and training, updates and security patches, automatic backups and restorations, domain registration and renewal, security certificate and renewals, unlimited email addresses (within reason), and basically everything you need to have your website online and working properly.
Agreement Terms
The initial term of the agreement is 24 months and will automatically renew for another 24 months. At the end of each term you own your site and can take it to another provider if you choose, no questions asked. However, if the agreement renews for another 24 month term we will redesign your website at no additional cost to you. That's just our way of saying "thank you for letting us be Your-Web-Guys"
At a glance:
For a quick reference of the highlights in the agreement we put together this bullet list. You can see the specific verbiage by downloading a pdf version of our agreement here.
- Domain registration in your name
- Unlimited Pages/Products
- All basic scripting needed
- Any and all photography needed
- Digitization/creation of your company logo
- Search Engine optimization
- Customized graphics
- 24 month term (WAC)
- You own all work done by us at the end of the term
- Complete redesign at renewal
Click here to schedule instantly
- Log into the web mail program for your domain:
http://[your-domain].com/mail (change [your-domain] to your domain) - Then click on the support icon in the upper right hand corner marked "settings"
- Click the button marked "password" on the menu on the right side of the screen once the settings page loads.
- enter your old password and then your new password twice and click "save"
- That's it, your new password has been activated.
In order to work with zipped files, they must be unzipped or extracted first. Windows has a built in program called Windows Compressed Folders which can do this for you. If you have installed a zip program, such as WinZip or 7-Zip, Windows Compressed Folders may not be easily available on your computer. If you follow the instructions below for Windows Compressed Folders, but a different program opens, you can still follow the instructions listed, and it should generally still work.
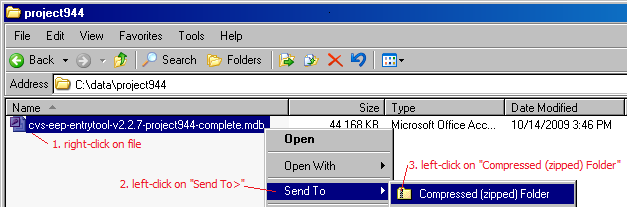
- To zip a file, find the file in Windows Explorer (file browser).
- Right-click on the file, left-click on Send To > , then left-click on Compressed (Zipped) Folder:
- Windows creates a temporary file (highlighted letters) and may show a "Compressing..." progress box:
- When Windows finishes compression, a new .zip file has been created in the same folder as your unzipped file, with the same name except with a .zip extension:
Note that in most cases, the file size will be much smaller. Some files can't be compressed much, such as .jpg pictures. Others files, such as text and database files, compress to a small fraction of the size of the uncompressed file.
What if the layout I want has flash buttons or a flash intro on it?
Update
Flash has completely gone the way of the Dodo bird. You certainly dont want us to do anything with it. If you still have flash on your website, you need to update it asap. Schedule a meeting with one of Your-Web-Guys using
 The only person who can speak with authority on your business and products or services is you. Because of that, the short answer is no we cannot create the actual verbiage and text content for your website. However we can give you some tips and tricks which will help you get started. If all else fails we do work with several copywriters and content experts who specialize in providing crisp, clean, search engine optimized and well thought out verbiage with only a little input from you to get them started. They can get a bit pricy, but when we have had clients opt for this in the past they have felt it very much worth the extra cost.
Content Creation Tips:
- Start with major topics
Typically there are five pages which make up your average website. They are listed below, but if you have different needs they are not set in stone. Use these pages as major topics and start writing your content from that point.- Home page - consists of a welcome message or possibly a mission statement
- About us - information about the company and/or the people who work there
- Services/Products - self explanatory, but dont skimp on this one, the more text the better... we will break it down into more pages if it gets too long.
- Location - consists of an embedded dynamic google map that will give turn by turn directions to your location from their front door.
- Contact Us - usually a form for folks to fill out with specific information you would like to collect from them. Also includes phone numbers and other means of contact
- Write how you speak
When you are speaking to someone about your product or service you have scripts that you more or less go by each time. Write them down and you have a great starting point for your web content. - The more the better
When it comes to websites and specifically seo content is king. A picture may be worth a thousand words to a human, but to a search engine spider a picture is just a bunch of pixels. Only a thousand words are worth a thousand words in the search engine world. If it gets too wordy we will break it down and make more pages out of your content. - Use your competitors' content as a jumping off point
Although imitation is the most sincere form of flattery, we don't want to copy or plagiarize anyone (if we get a cease and desist order we will yank the content without question). However, piggy-backing off of others' ideas is not only a good way to get started, it is also a great way to improve upon what they have already started. - Always think F.A.B.
For each of your products and services use the F.A.B. method. It stands for Feature Advantage Benefit. The feature is whatever you want to highlight for that product or service. The advantage is how that feature is not only exclusive to your company, but also how it can directly give them an advantage over their competitors. The Benefit is how it will make them money. Using this time honored approach to selling your products and services will help flesh out your general ideas of what you want to have your website exhibit.
Website Design
In order to work with zipped files, they must be unzipped or extracted first. Windows has a built in program called Windows Compressed Folders which can do this for you. If you have installed a zip program, such as WinZip* or 7-Zip*, Windows Compressed Folders may not be easily available on your computer. If you follow the instructions below for Windows Compressed Folders, but a different program opens, you can still follow the instructions listed, and it should generally still work.
- Unzipping a file with Windows Compressed Folders
- Find the zipped file that you want to unzip in Windows Explorer. In this example, I'm showing cvs-eep-entrytool-v2.2.7.zip, in the folder C:data. Windows XP is shown here, but Windows Vista works in the same way:
Note that the file extension is .zip for zipped file. - Next, double-click the zipped file. This opens up the zipped file so that you can see the files that are inside it. With the above analogy of a set of books on a bookshelf, you are now seeing the book spines on the shelf:
Notice the address bar now says that you are in a folder with a .zip extension and shows a zipped file icon as well. The file inside this zipped file is shown as a normal unzipped file. In this case, it's an .mdb file or Microsoft database. Do not double-click this file to open it when inside a zipped folder. That's like trying to read a book before taking it off the shelf.This step is the step that confuses a lot of people. This appears to be a normal folder on your computer, but in fact, you are within a single zipped file. - Single-click the file(s) and/or folder(s) you want to unzip. If you want to select all files and folders (even if there is only one) in the .zip file, press Ctrl-A on your keyboard:
Notice that the files are now selected. In the above screenshot, a blue background shows that a file is selected. The background for selected files could be a different color on your computer. - Now, copy the file(s) by pressing Ctrl-C on your keyboard.
- Then, click the "back" button to return to the previous folder:
- Now you are in the original folder, which is not a zipped file (in this case, C:data):
- Lastly, paste the file(s) into this folder by pressing Ctrl-V on your keyboard. This copies the files as unzipped files into the folder you are currently viewing:
This may take a few minutes or longer for large files. - When the file has completed copying, both the .zip file and the unzipped file(s) are in the same folder. You can use the .zip file as a backup copy or delete it. You can now work with the unzipped files. In the above analogy, you have pulled book(s) off the shelf and can read them. Enjoy!
This is a question we get quite often, and while it seems simple enough to answer, it is actually quite a complex subject. You can find all kinds of advice out there on what colors to use when and to evoke which emotion. Problem is that everyone perceives colors differently depending on their personal experience, the context the colors are used in, and other factors which range from the mood of the person viewing it to the weather outside. So in a nutshell there are no standard rules regarding colors and marketing.
We did find an excellent article that we re-blogged on our site which goes into exquisite detail about all the nuances and specifics when it comes to color schemes and how to market with them. Read the post here.
When you have a general idea of how you want to proceed there is an excellent tool that we suggest you use to make sure the colors you choose complement each other mathematically. Yes there is a way to use math to make sure your colors look good together and do not clash with each other. Paletton.com allows you to play with the colors algorithmically through an easy to use interface based on a simple color wheel. Click and drag the wheel to see your changes in real time. Once you have a color pallet you like for your website, you simply click share it and enter the email support@your-web-guys.com - we will take it from there.
You do. Plain and simple. Your-Web-Guys doesn't force you to stay with us for any reason. Once you have paid for it, it is yours - period, paragraph.
You can see the specific verbiage by downloading a pdf version of our agreement here.
At Your-Web-Guys we are always striving to make the small business owner's life easier. Smart businesses know that if you can use someone else's money to build your business you should take advantage of that. When we looked at the initial setup/design costs for a website we noticed that many small business owners, while they could afford a $4 to $5 thousand dollar expense, they had much better things to spend it on than a website design. That's why we developed our industry leading $0 Setup/Design program. We build or redesign the website for nothing out of pocket and simply spread those costs out over a period of time with approved credit.
Everything is included
Just like our traditional agreement, everything is included in the monthly fee. That includes hosting and maintenance, support and training, updates and security patches, automatic backups and restorations, domain registration and renewal, security certificate and renewals, unlimited email addresses (within reason), and basically everything you need to have your website online and working properly.
Agreement Terms
The initial term of the agreement is 24 months and will automatically renew for another 24 months. At the end of each term you own your site and can take it to another provider if you choose, no questions asked. However, if the agreement renews for another 24 month term we will redesign your website at no additional cost to you. That's just our way of saying "thank you for letting us be Your-Web-Guys"
At a glance:
For a quick reference of the highlights in the agreement we put together this bullet list. You can see the specific verbiage by downloading a pdf version of our agreement here.
- Domain registration in your name
- Unlimited Pages/Products
- All basic scripting needed
- Any and all photography needed
- Digitization/creation of your company logo
- Search Engine optimization
- Customized graphics
- 24 month term (WAC)
- You own all work done by us at the end of the term
- Complete redesign at renewal
Click here to schedule instantly
In order to work with zipped files, they must be unzipped or extracted first. Windows has a built in program called Windows Compressed Folders which can do this for you. If you have installed a zip program, such as WinZip or 7-Zip, Windows Compressed Folders may not be easily available on your computer. If you follow the instructions below for Windows Compressed Folders, but a different program opens, you can still follow the instructions listed, and it should generally still work.
- To zip a file, find the file in Windows Explorer (file browser).
- Right-click on the file, left-click on Send To > , then left-click on Compressed (Zipped) Folder:
- Windows creates a temporary file (highlighted letters) and may show a "Compressing..." progress box:
- When Windows finishes compression, a new .zip file has been created in the same folder as your unzipped file, with the same name except with a .zip extension:
Note that in most cases, the file size will be much smaller. Some files can't be compressed much, such as .jpg pictures. Others files, such as text and database files, compress to a small fraction of the size of the uncompressed file.
A website consists of several elements. One of the most important one is the photographs that are used in conjunction with the other content on the site. If we did not include photography in our design packages then we would be neglecting a huge part of your web design. Because of that we provide photography in two forms.
- Custom photo shoots of you, your people, your location(s), and your products
- Stock Photography of things that go with your content
Responsive web design or (RWD) is specific techniques and code that allows a website to display differently depending upon what type of device it is being viewed on without using a totally different set of html instructions. In other words, a responsive website will generally look the same no matter what device is used to view it. For more information please click here
Without a doubt. A good company logo is a very important piece of the web presence puzzle. We can even digitize your existing logo at no additional charge. If you don't have a company logo we can work with you to make one. A good web presence isn't complete without branding and you cant brand your company without a good logo which can represent your company with one picture. Make sure you don't skimp on your logo. It is the single most important decision you will make when starting a small business.
We actually don't, depending on your definition of "template". We use 3 party design layouts because they are fast, inexpensive, and of far better quality than anything we could come up with from scratch. Far too often we see web design firms denigrating the use of templates. They imply that template based websites are somehow inferior to their totally custom designs. They are not wrong... a template based website such as what you get from intuit or website tonight is certainly not what you want... nor is it what Your-Web-Guys do. However if they think that what we do is the same as that then they are absolutely wrong. It is very rare to find a design firm which produces a completely custom product at a price anywhere near the rates we can offer because most of the work is already done. The labor you pay is almost non-existent because of the speed with which we can have a template customized compared to how long it takes someone to make everything from scratch.
Isn't it better to have a totally original site?
Sure, if the two were of the same caliber design. Unfortunately it is very cost prohibitive to get an original design of the same quality and professional level of a design layout from our database. Original designs of the same quality of the layouts we use cost literally two to three thousand dollars, if not more. Why would you want to pay that amount of money when you can get a design of the same quality at a fraction of the cost. The only drawback is that a couple other companies may have similar site designs. That doesn't mean your site will be the same as anyone else's though. Quite the contrary. While working with you, our customization process will make your site totally unique and indistinguishable from the few other companies' sites which are made from the same layout. And we never use the same layout for two of our clients.
Absolutely... but not from us. We specialize in low cost, high value web solutions for small businesses and we have never found a cost effective way to create and maintain a web presence from scratch. If you have the funds and prefer to have a unique website for your business then we are not the company you want. It is very rare that we run across a company that needs a from scratch website because our design layout database is so comprehensive. In addition, our customization process is so complete that after we are done with it, your website will be almost 100% unique. In other words, if you cannot find a layout in our database that suits your fancy then your fancy is just too fanciful.
Are there any web designers you recommend that will do it?
There are many design firms out there, however it is difficult for us to recommend any of them because we cannot justify the fees they charge. To us they are all over priced and under developed, but we are a bit biased 😉
What if the layout I want has flash buttons or a flash intro on it?
Update
Flash has completely gone the way of the Dodo bird. You certainly dont want us to do anything with it. If you still have flash on your website, you need to update it asap. Schedule a meeting with one of Your-Web-Guys using
Many sites utilize flash for their navigation buttons or for intros in order to impress prospective clients. Flash is very impressive if it is done well because it is visually pleasing while still loading quickly. Unfortunately, even though flash is very... flashy [ahem], search engines could never parse the content. It is basically a graphic and therefore just a bunch of pixels to a search engine so you do not want a website made completely of flash
Update
Flash has been depreciated and will no longer be supported by any browsers in the near future. This has happened because of the popularity of Apple's i-devices such as the iphone and ipad. Apple and the company who makes flash, Adobe, do not get along very well and because of that Apple simply never supported flash content on their i-devices... ever. Initially this was a draw back for Apple, but has ultimately lead to new technology and scripting languages such as HTML5 and CSS3 which will ultimately replace and surpass flash in the long run.
Update II
The long run has come and gone. Flash has completely gone the way of the Dodo bird. If you still have flash on your website, you need to update it asap. Schedule a meeting with one of Your-Web-Guys using
The only person who can speak with authority on your business and products or services is you. Because of that, the short answer is no we cannot create the actual verbiage and text content for your website. However we can give you some tips and tricks which will help you get started. If all else fails we do work with several copywriters and content experts who specialize in providing crisp, clean, search engine optimized and well thought out verbiage with only a little input from you to get them started. They can get a bit pricy, but when we have had clients opt for this in the past they have felt it very much worth the extra cost.Content Creation Tips:
- Start with major topics
Typically there are five pages which make up your average website. They are listed below, but if you have different needs they are not set in stone. Use these pages as major topics and start writing your content from that point.- Home page - consists of a welcome message or possibly a mission statement
- About us - information about the company and/or the people who work there
- Services/Products - self explanatory, but dont skimp on this one, the more text the better... we will break it down into more pages if it gets too long.
- Location - consists of an embedded dynamic google map that will give turn by turn directions to your location from their front door.
- Contact Us - usually a form for folks to fill out with specific information you would like to collect from them. Also includes phone numbers and other means of contact
- Write how you speak
When you are speaking to someone about your product or service you have scripts that you more or less go by each time. Write them down and you have a great starting point for your web content. - The more the better
When it comes to websites and specifically seo content is king. A picture may be worth a thousand words to a human, but to a search engine spider a picture is just a bunch of pixels. Only a thousand words are worth a thousand words in the search engine world. If it gets too wordy we will break it down and make more pages out of your content. - Use your competitors' content as a jumping off point
Although imitation is the most sincere form of flattery, we don't want to copy or plagiarize anyone (if we get a cease and desist order we will yank the content without question). However, piggy-backing off of others' ideas is not only a good way to get started, it is also a great way to improve upon what they have already started. - Always think F.A.B.
For each of your products and services use the F.A.B. method. It stands for Feature Advantage Benefit. The feature is whatever you want to highlight for that product or service. The advantage is how that feature is not only exclusive to your company, but also how it can directly give them an advantage over their competitors. The Benefit is how it will make them money. Using this time honored approach to selling your products and services will help flesh out your general ideas of what you want to have your website exhibit.
Google Analytics is a fantastic program that can help you make sense of what surfers are hitting your site, what they are looking at and where they came from and are going to. This is a quick video of what analytics can do for you and how it works. Every website that Your-Web-Guys builds has analytics built in from day one.
Website Domains/Hosting
There is none. Some of our clients use more and some use less so it all equals out. Keep in mind that we run our own dedicated servers and we have lots of bandwidth to spare. We don't want you to worry about sending too many people to your site so we just don't charge anything for it... pretty sweet eh?
What exactly is transfer?
Transfer is the amount of information sent from your space on our servers to customers who view your site. Things like graphics and images use a relatively large amount of bandwidth while text uses much less. Most hosting companies allot specific amounts of transfer for each customer and charge very large fees for overages. It's similar to cell phone plans. We, however, dont care how much transfer you use. We have plenty to spare and will get more if it is needed... it's all covered in your regular monthly fee.
A Top Level Domain or TLD is basically what comes after the dot in a website domain name. So for Your-Web-Guys.com the TLD is .com. Initially there were basically three TLD's available for folks to register domains on. They were .com .net and .org. Dot org domains were reserved for non profits, but that is no longer the case, anyone can register a .org domain name. Indeed, because of the explosive growth of the internet, TLD's have now expanded to many others such as .info .name .mobi .me .co .biz and many more.
Not sure which TLD you should register?
We still generally suggest you find a .com for your domain, but there are many other TLD's to choose from if you cannot compromise on the specific domain you want. In other words if your company name is Your Web Guys but the domain yourwebguys.com is taken (which it was when we first opened for business) it is better to choose a hyphenated .com such as Your-Web-Guys.com rather than yourwebguys.biz or dot info. However, if you would also like to have a second domain for your website that is completely do-able. For instance, we have two domains that will get you to our website, both Your-Web-Guys.com and YourWebGuys.net will get you to the same place
At Your-Web-Guys we are always striving to make the small business owner's life easier. Smart businesses know that if you can use someone else's money to build your business you should take advantage of that. When we looked at the initial setup/design costs for a website we noticed that many small business owners, while they could afford a $4 to $5 thousand dollar expense, they had much better things to spend it on than a website design. That's why we developed our industry leading $0 Setup/Design program. We build or redesign the website for nothing out of pocket and simply spread those costs out over a period of time with approved credit.
Everything is included
Just like our traditional agreement, everything is included in the monthly fee. That includes hosting and maintenance, support and training, updates and security patches, automatic backups and restorations, domain registration and renewal, security certificate and renewals, unlimited email addresses (within reason), and basically everything you need to have your website online and working properly.
Agreement Terms
The initial term of the agreement is 24 months and will automatically renew for another 24 months. At the end of each term you own your site and can take it to another provider if you choose, no questions asked. However, if the agreement renews for another 24 month term we will redesign your website at no additional cost to you. That's just our way of saying "thank you for letting us be Your-Web-Guys"
At a glance:
For a quick reference of the highlights in the agreement we put together this bullet list. You can see the specific verbiage by downloading a pdf version of our agreement here.
- Domain registration in your name
- Unlimited Pages/Products
- All basic scripting needed
- Any and all photography needed
- Digitization/creation of your company logo
- Search Engine optimization
- Customized graphics
- 24 month term (WAC)
- You own all work done by us at the end of the term
- Complete redesign at renewal
Click here to schedule instantly
There are two different ways of choosing your domain name. Either pick your company's name or a specific keyword or phrase you want to target for search engines. Search engines put a lot of weight on the domain name when ranking results. However, using a domain name with keywords in it might not be conducive to your current or potential customers remembering the domain name when trying to get more information about your business. The choice is up to you, but remember your domain name is very important so choose wisely.
Here is a video from a google employee on keyword rich domains vs brandable domains:
[media id=4]
Google Analytics is a fantastic program that can help you make sense of what surfers are hitting your site, what they are looking at and where they came from and are going to. This is a quick video of what analytics can do for you and how it works. Every website that Your-Web-Guys builds has analytics built in from day one.
Spam filters are awesome, but sometimes can block legitimate email accidentally. Because you are not notified when the system blocks a message, it is not a bad idea to check your spam folder every so often to make sure nothing legitimate has been blocked. Here is how you can see what has been intercepted by the spam filters on your account:
- Log in to your web based email (if you are not sure how to do that click here - will open in a new window)
- On the left side, under the main InBox, there is a list of other folders that the email system uses
- When our server blocks a spam email message, it goes into a folder on the server called "Junk"
- To view what has been sent to that folder, simply click on it
- If any of the messages in that folder are not spam, please forward a copy to us (at support@your-web-guys.com) letting us know that it should not be filtered in the future
When you are logged into your gmail account, do the following steps:
- Click the gear icon and click Settings
- Click Accounts & Import
- Look for Check Mail from Other Accounts
- Click Edit alongside the account you want to change
- Change the password
- Save changes
Send us a support request if you have any trouble.
Contrary to popular belief, the Mail app in Windows 8 isn’t just a client for Hotmail/Windows Live Mail/Outlook; it can manage accounts from other common providers like Google, Yahoo!, AOL etc., as well as having the ability to synchronize any IMAP enabled client. Let’s take a look at how you can set up Windows 8 Mail app to your liking.
The reason most people fail to discover the support for other email services in the native Mail app is that you cannot add another account until you link your own Microsoft account with the client. Assuming that you haven’t set up Mail in Windows 8 at all yet, simply click the Live Tile on the Start Screen and you should see a screen like this:
If you already have a Microsoft account, sign-in here and let the application sync your Outlook mail or Windows Live Mail. Once that’s done, hit the Win key + I combination to pull up Settings for the Mail app. Click/tap Accounts, followed by Add New Account next to the + sign. A list of all the common providers will be presented, and all you need to do here is enter the login information to sync the new account with Windows 8 Mail app.
Special thanks to RedmondPie.com for this outstanding tutorial - click here for the full article
A whitelist is a list of email addresses that you want to receive email from. By adding an address to your whitelist, you are telling the email system not to filter email from that address. Follow the instructions below to add our email address(s) or any other address to your whitelist.
Here are the instructions for some of the most popular email programs:
AOL
You will need to add our "From addresses", support@your-web-guys.com & socialmedia@your-web-guys.com to your AOL address book:
- Click the Mail menu and select Address Book. PROBLEM: AOLuot;Address Card for New Contact" window to load.
- Once loaded, cut and paste support@your-web-guys.com into the "Other E-Mail" field.
- Make our From address the "Primary E-Mail" address by checking the associated check box.
- Click the Save button.
- Repeat the process with the socialmedia@your-web-guys.com address.
Yahoo!
You will need to set up a filter to redirect our mailing into your inbox:
Open your mailbox and click on Mail Options (upper right hand corner).
- Select Filters (bottom left corner).
- Click the Add link on the Filters page.
- Update the "From headerUpdate the "From header:" rule with the following 2 pieces of information: "contains" and 'your-web-guys.com'. This essentially allows the mail server to identify our mailing based on the email From address.
- Click the Choose Folder pull down menu and select inbox.Add Filter button.
Hotmail
You will need to add our From addresses, support@your-web-guys.com & socialmedia@your-web-guys.com , to your Hotmail Safe List:
- Open your mailbox and click “Options” (upper right hand corner).
- Click the “Junk E-Mail Protection” link (top of page).
- Select the “Safe List” link (2nd from bottom).
- Copy and paste support@your-web-guys.com the dialog box titled “Type an address or domain”.
- Click the “Add” button next to the dialog box.
- Repeat the process for the socialmedia@your-web-guys.com address.
Gmail
You will need to add our From addresses, support@your-web-guys.com & socialmedia@your-web-guys.com, to your Gmail Contacts List:
- Click Contacts along the left side of any Gmail page.
- Click Add Contact.
- Copy and paste our From address, support@your-web-guys.com into the primary email address dialog box.
- Click Save.
- Repeat the process with the socialmedia@your-web-guys.com address.
Mozilla Thunderbird
You will need to add our From addresses, support@your-web-guys.com & socialmedia@your-web-guys.com , to your Thunderbird Address Book and configure your Junk Mail Controls to whitelist your address book.
Add our From address into your Personal Address Book:
- Click the Address Book button.
- Make sure the Personal Address Book is highlighted.
- Click the New Card button. This will launch a New Card window that has 3 tabs: Contact, Address & Other.
- Under the Contact tab, copy and paste our “From” address, support@your-web-guys.com into the Emaildialog box.
- Click OK.
- Repeat the process with the socialmedia@your-web-guys.com address.
Outlook 2003
You will need to add our From addresses, support@your-web-guys.com & socialmedia@your-web-guys.com to your Safe Senders list:
- On the Tools menu, click Options.
- On the Preferences tab, click Junk E-mail.
- On the Safe Senders tab, click Add.
- In the Add address, copy and paste in our From address, support@your-web-guys.com
- Click OK.
- Repeat the process with the socialmedia@your-web-guys.com address.
This is information on how to set up an email client such as Outlook, Thunderbird, a cell phone email app, or Apple Mail. Use this link if you would like to use a web browser based system.
For those of you who know how to set up an email account feel free to simply use the information below to do so. If you need more specific, step by step instructions they are further down. Of course [yourdomain] should be replaced with, whatever your domain is and .com should be changed if your domain isnt a .com (ie a .org or .biz or whatever it might be). Also if your name isnt Bill Johnston, you probably want to change it to your name 🙂
Server Information
- Incoming mail server (IMAP): mail.[yourdomain].com
- Outgoing mail server (SMTP): mail.[yourdomain].com (if this doesn't work click here for an alternative setting)
User Information
- Your Name: Bill Johnston
- E-mail Address: billjohnston@[yourdomain].com
Logon Information
- User Name: billjohnston@[yourdomain].com
- Password: [whatever you specified to us] click here to learn how to change your email password
Setting up Outlook / Outlook Express
Open outlook and on the tool bar at the top click on Tools>E-Mail Accounts. then follow these instructions:
- Select "add new email account" if it asks and click next
- server type select "IMAP" if it asks and click next
- enter the user information as specified above and click "Test Account Settings"
- thats it! if your configuration was correct the test will be successful - if there are any problems, feel free to submit a trouble ticket
Depending upon what isp (internet service provider) you have, the setting described in the email set up faq page for your SMTP (outgoing) mail server may not work. Some ISP's block 3rd party email servers for different reasons. If this is the case there are two options that my help solve the issue.
Option 1
Change the outgoing server port from 25 to 587. Port 25 specifically is what is being blocked usually so by using an alternate standard smtp port it should solve the problem.
Here's How
Open outlook and on the tool bar at the top click on Tools>E-Mail Accounts. then follow these instructions:
- Select "view or change existing email accounts" if it asks and click next
- Leave all the settings the same except for the SMTP (outgoing) Mail server port.
- Change it from port 25 to 587
- Click "Test Account Settings"
- thats it! if your configuration was correct the test will be successful
Option 2
Change the SMTP server from mail.[yourdomain].com to mail.[yourisp].com. In other words, if your isp is Comcast then you would change your smtp server to mail.comcast.net.
Here's How
Open outlook and on the tool bar at the top click on Tools>E-Mail Accounts. then follow these instructions:
- Select "view or change existing email accounts" if it asks and click next
- Leave all the settings the same except for the SMTP (outgoing) Mail server.
- Change it to mail.[yourisp].com
- Click "Test Account Settings"
- thats it! if your configuration was correct the test will be successful
- if there are any problems, feel free to submit a trouble ticket
How to do it:
- Open up your favorite internet browser
- Type the following URL into the address bar:
- http://www.[yourdomain].com/mail
- Make sure you replace [yourdomain].com with your actual domain name (i.e. your-web-guys.com)
- Enter your login information as shown below.
- Name: type your full email address (i.e. rkinney@your-web-guys.com).
- Password: type whatever your password is.
- That's it! you should be able to send receive and view any emails which are still on the sever.
if there are any problems, feel free to submit a trouble ticket
Even though Your-Web-Guys does not limit the amount of space you have available for your archived emails and other data for your website, server speed and performance depends on only a certain amount of space being used for each email address.
Outlook’s Auto Archive function is set to automatically back up Deleted Items, Sent Items, and expired tasks and calendar items. But if you get hundreds of messages per day and don’t delete them or move them from your Inbox to a folder located on your local computer, you run the risk of sabotaging your account and our servers. Exceed 2GB of storage in an overstuffed Inbox and everything really starts to run slow.
Yet solving the problem is doable. we recommend that you or your IT support team follow the steps outlined below to change Auto Archive’s settings. Please note, this is for outlook versions newer than 2010 including 2013 and 2016. If your version of outlook is older, try visiting microsoft's help page
Archive older items automatically
- Click File > Options > Advanced.
- Under AutoArchive, click AutoArchive Settings.
- Click the Run AutoArchive every n days box and specify how often to run AutoArchive. The default is fine.
- Choose any other options you want, such as having Outlook delete old items instead of archiving them. For more details on these options visit this Microsoft help page
- Want to access your archived emails? Simple — they’re waiting for you right on the left-hand column of folders — or under the list of .pst files on your computer — with all of your other mail folders. The key? They’re no longer taking up space in your mailbox.
Change the AutoArchive settings for an individual folder
- In the Navigation Pane's folder list, right-click the folder you want to change, and click Properties.
- On the AutoArchive tab, choose the options you want.
Of course, archiving can’t cure all email diseases. If you access your mail via an Outlook Web App, any emails archived on your local computer won’t show up online — archiving them means they’re no longer hosted on the server. And a .pst file or archived folder stored on your local hard drive is still susceptible to disastrous data loss if it’s not backed up as part of your backup and disaster recovery (BDR) plan.
Also, remember that Outlook is not a real email archiving solution — this information will simply help you free up storage space within the program, NOT keep your email secure via offsite backup or searchable across years of accumulated messages.
- Log into the web mail program for your domain:
http://[your-domain].com/mail (change [your-domain] to your domain) - Then click on the support icon in the upper right hand corner marked "settings"
- Click the button marked "password" on the menu on the right side of the screen once the settings page loads.
- enter your old password and then your new password twice and click "save"
- That's it, your new password has been activated.
Internet Browsers
Compatibility mode was introduced in IE8 and was a useful tool to correctly view a website if it was not designed with the newer standards of IE8 in mind. Without it many websites would not load correctly. However, because any site that Your-Web-Guys build for you will always be up to date using the latest standards it can actually have the opposite effect if turned on when not needed. If your website is not loading properly in Internet Explorer, but is loading correctly in Fire Fox or Chrome or other browsers, you probably have accidentally turned on the compatibility mode feature in Internet Explorer. Here are a few ways to make sure it is turned off. If your site still does not load correctly and you are sure compatibility mode is turned off then please contact support so we can take a look at the problem.
Click/tap on the highlighted (blue) Compatibility View icon button. (See screenshot below)
NOTE: The webpage will now reload with Compatibility View turned off for it.
![]()
Browsers that support JavaScript allow you to take advantage of advanced features of websites created by Your-Web-Guys, including flash menus for easy site navigation. If you have problems viewing the flash menus, you probably have JavaScript turned off in your browser, or your browser doesn´t support JavaScript. If your browser is listed below, it supports JavaScript. If you use one of these browsers but still cannot see JavaScript features, JavaScript may be turned off in your browser.To turn on JavaScript, follow the directions below:
- Microsoft® Internet Explorer® 6.x and 7.x (Windows®)
- Select Internet Options from the Tools menu or, for Version 7, from Tools in the upper right portion of your screen.
- Click the Security tab.
- Click Custom level... in Security level for this zone.
- Scroll down to Scripting, near the bottom of the list.
- Under Active scripting, choose Enable.
- Click OK to leave Security Settings. Click OK to leave Internet Options.
- Mozilla® Firefox® 3.x (Windows)
- Select Options... from the Tools drop-down menu.
- Select the Content section from the options at the top of the pop-up page.
- Check the "Block pop-up windows," "Load images automatically," "Enable JavaScript" and "Enable Java" boxes.
- Click OK.
- Google Crome
- Select Customize and control Google Chrome (wrench Icon) to the right of the address bar.
- From the drop-down menu, select Options.
- Select the Under the Hood tab at the top of the window.
- Under the Privacy heading, select the Content settings button.
- On the left, under the features heading, select JavaScript.
- Select the Allow all sites to run JavaScript radio button.
- Finally, close both preference windows, and refresh the browser.
- SafariTM 3.x (Macintosh®)
- Select Preferences... from the Safari drop-down menu.
- Select the Security section from the options at the top of the pop-up page.
- Under "Web Content," check the "Enable plug-ins," "Enable Java" and "Enable JavaScript" boxes.
- Close the Security window.
Sometimes an internet browser will store or "cache" web pages so that they will load faster the next time you visit them. Many times your website will not show the changes that Your-Web-Guys have made because the browser you use will display the old version of a page from its cache rather than the new updated version of it. To solve this problem you should delete your browser cache. Click on name of the browser you are using from the list below to be taken to a page with instructions on how to do this.
Website Content
In order to work with zipped files, they must be unzipped or extracted first. Windows has a built in program called Windows Compressed Folders which can do this for you. If you have installed a zip program, such as WinZip* or 7-Zip*, Windows Compressed Folders may not be easily available on your computer. If you follow the instructions below for Windows Compressed Folders, but a different program opens, you can still follow the instructions listed, and it should generally still work.
- Unzipping a file with Windows Compressed Folders
- Find the zipped file that you want to unzip in Windows Explorer. In this example, I'm showing cvs-eep-entrytool-v2.2.7.zip, in the folder C:data. Windows XP is shown here, but Windows Vista works in the same way:
Note that the file extension is .zip for zipped file. - Next, double-click the zipped file. This opens up the zipped file so that you can see the files that are inside it. With the above analogy of a set of books on a bookshelf, you are now seeing the book spines on the shelf:
Notice the address bar now says that you are in a folder with a .zip extension and shows a zipped file icon as well. The file inside this zipped file is shown as a normal unzipped file. In this case, it's an .mdb file or Microsoft database. Do not double-click this file to open it when inside a zipped folder. That's like trying to read a book before taking it off the shelf.This step is the step that confuses a lot of people. This appears to be a normal folder on your computer, but in fact, you are within a single zipped file. - Single-click the file(s) and/or folder(s) you want to unzip. If you want to select all files and folders (even if there is only one) in the .zip file, press Ctrl-A on your keyboard:
Notice that the files are now selected. In the above screenshot, a blue background shows that a file is selected. The background for selected files could be a different color on your computer. - Now, copy the file(s) by pressing Ctrl-C on your keyboard.
- Then, click the "back" button to return to the previous folder:
- Now you are in the original folder, which is not a zipped file (in this case, C:data):
- Lastly, paste the file(s) into this folder by pressing Ctrl-V on your keyboard. This copies the files as unzipped files into the folder you are currently viewing:
This may take a few minutes or longer for large files. - When the file has completed copying, both the .zip file and the unzipped file(s) are in the same folder. You can use the .zip file as a backup copy or delete it. You can now work with the unzipped files. In the above analogy, you have pulled book(s) off the shelf and can read them. Enjoy!
This is a question we get quite often, and while it seems simple enough to answer, it is actually quite a complex subject. You can find all kinds of advice out there on what colors to use when and to evoke which emotion. Problem is that everyone perceives colors differently depending on their personal experience, the context the colors are used in, and other factors which range from the mood of the person viewing it to the weather outside. So in a nutshell there are no standard rules regarding colors and marketing.
We did find an excellent article that we re-blogged on our site which goes into exquisite detail about all the nuances and specifics when it comes to color schemes and how to market with them. Read the post here.
When you have a general idea of how you want to proceed there is an excellent tool that we suggest you use to make sure the colors you choose complement each other mathematically. Yes there is a way to use math to make sure your colors look good together and do not clash with each other. Paletton.com allows you to play with the colors algorithmically through an easy to use interface based on a simple color wheel. Click and drag the wheel to see your changes in real time. Once you have a color pallet you like for your website, you simply click share it and enter the email support@your-web-guys.com - we will take it from there.
Compatibility mode was introduced in IE8 and was a useful tool to correctly view a website if it was not designed with the newer standards of IE8 in mind. Without it many websites would not load correctly. However, because any site that Your-Web-Guys build for you will always be up to date using the latest standards it can actually have the opposite effect if turned on when not needed. If your website is not loading properly in Internet Explorer, but is loading correctly in Fire Fox or Chrome or other browsers, you probably have accidentally turned on the compatibility mode feature in Internet Explorer. Here are a few ways to make sure it is turned off. If your site still does not load correctly and you are sure compatibility mode is turned off then please contact support so we can take a look at the problem.
Click/tap on the highlighted (blue) Compatibility View icon button. (See screenshot below)
NOTE: The webpage will now reload with Compatibility View turned off for it.
![]()
Google maps has changed their API access requirements. Now you must have billing set up before you can use the features that google maps provides for your website. This does not mean you will need to pay typically because when you enable billing, you get $200 free usage every month for Maps, Routes, or Places. Based on the millions of users using maps APIs today, most sites can continue to use Google Maps Platform for free with this credit. Here is how you set up the account:
- Part 1: set up your billing account
- go to https://cloud.google.com/maps-platform/?apis=maps
- click "get started"
- it may throw a popup asking you to enable billing for a project, if so click "create billing account" if not, continue with step 4
- you will now be asked for account information. select your country and agree to the terms of service
- set up your payment information. Do not select automatic billing as you probably wont need to actually be charged anything by their system. The payment info is just to reduce abuse (robots rarely have credit cards)
- answer the welcome questions: it doesnt really matter what you put in, then click continue
- if it asks how you want to protect your key click "maybe later"
- #didit your api and billing account is created
- Part 2: Give Your-Web-Guys access to the api settings
- in the api console, click on the navigation menu button in the upper left corner of your screen (looks like three horizontal lines)
- go to IAM & Admin
- click on "grant access" in the upper left above the title "permissions for project..."
- enter the following email into the new principals field
info@your-web-guys.com
- under assign roles select project > owner
- click save
- this will send an invitation to us so we can administrate your api for you.
Thats all you need to do! We will take it from there and make sure the api key is set up properly and is restricted from unauthorized use
No problem at all. We can add just about any script or software plug-in you can find for your web site. Our servers have just about every back end program needed to run almost any script out there. There is a nominal one time fee depending upon which type of script you may need. See a list of the scripts we have worked with in the past and what fees are associated with them in our Idea Center.
What if I know I want something but not specifically what script it is?
Either use our industry leading idea center or we can research and find a program which will suit your needs to a "t". Many times you will be surfing the web and come across a great feature on a competitors site. Problem is you have no idea what the script is called or what kind of script it is for that matter. We know, we do it all the time. We will see what you have found and get you something similar for your site at no additional charge... just the one time fee for adding the script and we will be on the case.
Of course!
One of the most important things you can do for your online marketing efforts is to update your website on an ongoing basis. Search engines place a premium on updates and how often new content is added. To make this process easy, we typically integrate your website with a content management system or CMS. Our customized CMS is designed so that you can update it easily and without any "geek knowledge" of code or the like. It is set up so that all you have to do is type. Everything else; such as navigation links, design elements, and other minutiae are done for you... automatically. There are several tutorials on how to add content to your website in the CMS tutorials section of our FAQ page.
Sometimes though, there are changes that need to be made to your website that will take more than just typing. When that is the case, we are always there to make those updates for you. We never want you to be left out in the cold and scary world of the geeks. The good news is that with our CMS we can usually make changes and add new functionality without ever charging you an additional fee. It depends on the level of the addition though, so take a look at our Idea Center to see some of the options and which would be an additional fee.
How quickly do you make the changes I request?
There is almost always one of us online keeping an eye on the service requests admin so we will update you with when the changes will be made almost instantaneously. The speed of when the actual changes will be made will depend upon workload, day of the week, level of difficulty of the request, and other factors but usually they will be finished within 24 hours. You can follow the progress of any support tickets you create through your client control panel
Some (and soon all) sites that Your-Web-Guys host have much of their content served through a CDN. CDN stands for Content Delivery Network. From the cloudflare website
A content delivery network (CDN) refers to a geographically distributed group of servers which work together to provide fast delivery of Internet content.
A CDN allows for the quick transfer of assets needed for loading Internet content including HTML pages, javascript files, stylesheets, images, and videos. The popularity of CDN services continues to grow, and today the majority of web traffic is served through CDNs, including traffic from major sites like Facebook, Netflix, and Amazon.
If you have ever wondered why websites like Facebook and Amazon load so quickly, its because they have much more money than you 🙂 But also because they use CDN's and now Your-Web-Guys Clients do too... at no additional charge.
Only problem is that a Cache of your website is saved on the CDN so that it can be delivered quickly. That means that if you make an update to your website, and the cache is not updated at the same time, then you wont see those changes right away.
We have a solution for this.
 There is a plugin that we use that integrates with Cloudflare's API that automatically updates the cache whenever you update your website. If you see the information shown in the screenshot to the right then your website has been updated with this fix and it should be working automatically. You can see this screen in your website admin area by clicking on Settings > Cloudflare as indicated by the purple arrows.
If you are still not seeing the updates you make then there is a possibility that the API is having trouble at that specific moment. Odds are it will pass and in a few hours you will see the updates. If that is not soon enough, send us a support request by logging into your Client Control Panel or simply sending an email to support@your-web-guys.com and we will manually clear the cache for you
In order to work with zipped files, they must be unzipped or extracted first. Windows has a built in program called Windows Compressed Folders which can do this for you. If you have installed a zip program, such as WinZip or 7-Zip, Windows Compressed Folders may not be easily available on your computer. If you follow the instructions below for Windows Compressed Folders, but a different program opens, you can still follow the instructions listed, and it should generally still work.
- To zip a file, find the file in Windows Explorer (file browser).
- Right-click on the file, left-click on Send To > , then left-click on Compressed (Zipped) Folder:
- Windows creates a temporary file (highlighted letters) and may show a "Compressing..." progress box:
- When Windows finishes compression, a new .zip file has been created in the same folder as your unzipped file, with the same name except with a .zip extension:
Note that in most cases, the file size will be much smaller. Some files can't be compressed much, such as .jpg pictures. Others files, such as text and database files, compress to a small fraction of the size of the uncompressed file.
A website consists of several elements. One of the most important one is the photographs that are used in conjunction with the other content on the site. If we did not include photography in our design packages then we would be neglecting a huge part of your web design. Because of that we provide photography in two forms.
- Custom photo shoots of you, your people, your location(s), and your products
- Stock Photography of things that go with your content
What if the layout I want has flash buttons or a flash intro on it?
Update
Flash has completely gone the way of the Dodo bird. You certainly dont want us to do anything with it. If you still have flash on your website, you need to update it asap. Schedule a meeting with one of Your-Web-Guys using
Many sites utilize flash for their navigation buttons or for intros in order to impress prospective clients. Flash is very impressive if it is done well because it is visually pleasing while still loading quickly. Unfortunately, even though flash is very... flashy [ahem], search engines could never parse the content. It is basically a graphic and therefore just a bunch of pixels to a search engine so you do not want a website made completely of flash
Update
Flash has been depreciated and will no longer be supported by any browsers in the near future. This has happened because of the popularity of Apple's i-devices such as the iphone and ipad. Apple and the company who makes flash, Adobe, do not get along very well and because of that Apple simply never supported flash content on their i-devices... ever. Initially this was a draw back for Apple, but has ultimately lead to new technology and scripting languages such as HTML5 and CSS3 which will ultimately replace and surpass flash in the long run.
Update II
The long run has come and gone. Flash has completely gone the way of the Dodo bird. If you still have flash on your website, you need to update it asap. Schedule a meeting with one of Your-Web-Guys using
The only person who can speak with authority on your business and products or services is you. Because of that, the short answer is no we cannot create the actual verbiage and text content for your website. However we can give you some tips and tricks which will help you get started. If all else fails we do work with several copywriters and content experts who specialize in providing crisp, clean, search engine optimized and well thought out verbiage with only a little input from you to get them started. They can get a bit pricy, but when we have had clients opt for this in the past they have felt it very much worth the extra cost.Content Creation Tips:
- Start with major topics
Typically there are five pages which make up your average website. They are listed below, but if you have different needs they are not set in stone. Use these pages as major topics and start writing your content from that point.- Home page - consists of a welcome message or possibly a mission statement
- About us - information about the company and/or the people who work there
- Services/Products - self explanatory, but dont skimp on this one, the more text the better... we will break it down into more pages if it gets too long.
- Location - consists of an embedded dynamic google map that will give turn by turn directions to your location from their front door.
- Contact Us - usually a form for folks to fill out with specific information you would like to collect from them. Also includes phone numbers and other means of contact
- Write how you speak
When you are speaking to someone about your product or service you have scripts that you more or less go by each time. Write them down and you have a great starting point for your web content. - The more the better
When it comes to websites and specifically seo content is king. A picture may be worth a thousand words to a human, but to a search engine spider a picture is just a bunch of pixels. Only a thousand words are worth a thousand words in the search engine world. If it gets too wordy we will break it down and make more pages out of your content. - Use your competitors' content as a jumping off point
Although imitation is the most sincere form of flattery, we don't want to copy or plagiarize anyone (if we get a cease and desist order we will yank the content without question). However, piggy-backing off of others' ideas is not only a good way to get started, it is also a great way to improve upon what they have already started. - Always think F.A.B.
For each of your products and services use the F.A.B. method. It stands for Feature Advantage Benefit. The feature is whatever you want to highlight for that product or service. The advantage is how that feature is not only exclusive to your company, but also how it can directly give them an advantage over their competitors. The Benefit is how it will make them money. Using this time honored approach to selling your products and services will help flesh out your general ideas of what you want to have your website exhibit.
Google Analytics is a fantastic program that can help you make sense of what surfers are hitting your site, what they are looking at and where they came from and are going to. This is a quick video of what analytics can do for you and how it works. Every website that Your-Web-Guys builds has analytics built in from day one.
Website Scripting
Compatibility mode was introduced in IE8 and was a useful tool to correctly view a website if it was not designed with the newer standards of IE8 in mind. Without it many websites would not load correctly. However, because any site that Your-Web-Guys build for you will always be up to date using the latest standards it can actually have the opposite effect if turned on when not needed. If your website is not loading properly in Internet Explorer, but is loading correctly in Fire Fox or Chrome or other browsers, you probably have accidentally turned on the compatibility mode feature in Internet Explorer. Here are a few ways to make sure it is turned off. If your site still does not load correctly and you are sure compatibility mode is turned off then please contact support so we can take a look at the problem.
Click/tap on the highlighted (blue) Compatibility View icon button. (See screenshot below)
NOTE: The webpage will now reload with Compatibility View turned off for it.
![]()
Google maps has changed their API access requirements. Now you must have billing set up before you can use the features that google maps provides for your website. This does not mean you will need to pay typically because when you enable billing, you get $200 free usage every month for Maps, Routes, or Places. Based on the millions of users using maps APIs today, most sites can continue to use Google Maps Platform for free with this credit. Here is how you set up the account:
- Part 1: set up your billing account
- go to https://cloud.google.com/maps-platform/?apis=maps
- click "get started"
- it may throw a popup asking you to enable billing for a project, if so click "create billing account" if not, continue with step 4
- you will now be asked for account information. select your country and agree to the terms of service
- set up your payment information. Do not select automatic billing as you probably wont need to actually be charged anything by their system. The payment info is just to reduce abuse (robots rarely have credit cards)
- answer the welcome questions: it doesnt really matter what you put in, then click continue
- if it asks how you want to protect your key click "maybe later"
- #didit your api and billing account is created
- Part 2: Give Your-Web-Guys access to the api settings
- in the api console, click on the navigation menu button in the upper left corner of your screen (looks like three horizontal lines)
- go to IAM & Admin
- click on "grant access" in the upper left above the title "permissions for project..."
- enter the following email into the new principals field
info@your-web-guys.com
- under assign roles select project > owner
- click save
- this will send an invitation to us so we can administrate your api for you.
Thats all you need to do! We will take it from there and make sure the api key is set up properly and is restricted from unauthorized use
No problem at all. We can add just about any script or software plug-in you can find for your web site. Our servers have just about every back end program needed to run almost any script out there. There is a nominal one time fee depending upon which type of script you may need. See a list of the scripts we have worked with in the past and what fees are associated with them in our Idea Center.
What if I know I want something but not specifically what script it is?
Either use our industry leading idea center or we can research and find a program which will suit your needs to a "t". Many times you will be surfing the web and come across a great feature on a competitors site. Problem is you have no idea what the script is called or what kind of script it is for that matter. We know, we do it all the time. We will see what you have found and get you something similar for your site at no additional charge... just the one time fee for adding the script and we will be on the case.
Google Analytics is a fantastic program that can help you make sense of what surfers are hitting your site, what they are looking at and where they came from and are going to. This is a quick video of what analytics can do for you and how it works. Every website that Your-Web-Guys builds has analytics built in from day one.
Purchasing from Your-Web-Guys
We all hate to be tied down to a long term contract, especially when we are dealing with the realities of an ever changing business environment. That's why, when we are Your-Web-Guys you don't have to worry about any long term commitments. The agreement you make with us has no time constraints what so ever. We will be Your-Web-Guys as long as you want us to be and not a moment longer. The work we do for you is yours from day one. You can take it to just about any other host out there and have it up and running without much headache at all. Of course it will be more of a headache than it would be if we were still Your-Web-Guys, but we understand that situations change and no matter how our relationship with you ends, we will remain friendly and helpful.
At a glance:
For a quick reference of the highlights in the agreement we put together this bullet list. You can see the specific verbiage by downloading a pdf version of our agreement here.
- Domain registration in your name
- 4-5 page website at minimum (dynamic packages have unlimited pages)
- All basic scripting needed
- Any and all photography needed
- First month of hosting
- Digitization/creation of your company logo
- Search Engine optimization
- Market research for traffic generation
- Customized graphics
You do. Plain and simple. Your-Web-Guys doesn't force you to stay with us for any reason. Once you have paid for it, it is yours - period, paragraph.
You can see the specific verbiage by downloading a pdf version of our agreement here.
We know all this sounds too good to be true, so we figured we aught to give you some information on how we do it so you will see that there really isn't any catch. The high service for such low prices is the result of simple and time honored business practices which most design firms, hosting companies, and webmasters just don't think about.
Here's how we do it:
There are so many resources out there to help keep things up and running quickly and inexpensively. We have spent years finding these resources and techniques so that we could better run our own web enterprises. You could easily find the same information we have if you had enough time to do so. But why would you want to? Keep in mind that our competition has been in business from day one designing websites or working on servers or maintaining others sites. They have never actually had to produce anything that is their own, so they know little to nothing about actually dealing with a bottom line in their online work. We have. Now you can take advantage of our years of experience and expertise. Add to that the outsourcing component of having us handle your online needs and you can see how having us be Your Web Guys is a great decision
$79.95 which is standard for every package. We don't nickel and dime you to death because we know you want a single number which will not fluctuate from month to month depending upon who knows what. Search Engine Optimization and Social Media Marketing are additional monthly fees, but they are optional and in addition to the standard $79.95 per month.
What does it include?
Hosting, maintenance, support, updates, etc. Just about anything you need on a daily basis will be included in the monthly fee. We don't charge for bandwidth or for disk space on our servers, we have plenty of room and when we run out we will get more. Don't worry about surprise charges. The only time that monthly invoice will show something different from $59.95 is when you ask us to change it.
However if you request additional services, there are additional fees. You can get an idea of what they would be in our industry leading Idea Center
At Your-Web-Guys we are always striving to make the small business owner's life easier. Smart businesses know that if you can use someone else's money to build your business you should take advantage of that. When we looked at the initial setup/design costs for a website we noticed that many small business owners, while they could afford a $4 to $5 thousand dollar expense, they had much better things to spend it on than a website design. That's why we developed our industry leading $0 Setup/Design program. We build or redesign the website for nothing out of pocket and simply spread those costs out over a period of time with approved credit.
Everything is included
Just like our traditional agreement, everything is included in the monthly fee. That includes hosting and maintenance, support and training, updates and security patches, automatic backups and restorations, domain registration and renewal, security certificate and renewals, unlimited email addresses (within reason), and basically everything you need to have your website online and working properly.
Agreement Terms
The initial term of the agreement is 24 months and will automatically renew for another 24 months. At the end of each term you own your site and can take it to another provider if you choose, no questions asked. However, if the agreement renews for another 24 month term we will redesign your website at no additional cost to you. That's just our way of saying "thank you for letting us be Your-Web-Guys"
At a glance:
For a quick reference of the highlights in the agreement we put together this bullet list. You can see the specific verbiage by downloading a pdf version of our agreement here.
- Domain registration in your name
- Unlimited Pages/Products
- All basic scripting needed
- Any and all photography needed
- Digitization/creation of your company logo
- Search Engine optimization
- Customized graphics
- 24 month term (WAC)
- You own all work done by us at the end of the term
- Complete redesign at renewal
Click here to schedule instantly
Without a doubt. A good company logo is a very important piece of the web presence puzzle. We can even digitize your existing logo at no additional charge. If you don't have a company logo we can work with you to make one. A good web presence isn't complete without branding and you cant brand your company without a good logo which can represent your company with one picture. Make sure you don't skimp on your logo. It is the single most important decision you will make when starting a small business.
CMS Tutorials
- go to http://www.[yourdomain]/admin
- Your username and password were entered at training, enter them here.
- If you do not remember your user name and password, click the "Lost your password?" link
- You can enter your username or your email address
- Your website will send you a link to create a new password in your email
- Click the link in the email and enter your new password
- You will be logged in after doing so
If you website is still in the production process (in other words, not published on your normal domain name)...
While in the production process, Your-Web-Guys should have sent you a specific url which you can use to review your website before it is published. This url, or web address, should look something like this:
To access your admin area for your site admin area, you need to add /admin to the end of that url... like this:
The rest of the login instructions are the same once you have the correct url.
If you did not get this temporary url, please send us a support email
Make sure you are logged in to your admin area. Click here if you are not sure how to do this.
Now that you are logged in you will see the Your-Web-Guys Dashboard. This will show you a quick snapshot of information about your website. On the left side you will see several different menu options. Each one does different things with your website, but for updating you will only need to deal with two of them most of the time. These are posts and pages.
The difference between the two is that posts are chronological in nature and pages are outside of chronology and higharcal. In other words a post is going to get old at some point in the future while pages have child and grand child pages in a hierarchy which are always visible.
Some good examples of posts would be promotions, events, and other news items.
Pages are more like what you think of as a webpage... an about us page or contact us page - information that should always be available no matter how old it is.
The most important question you should ask yourself is:
In other words does it ever need to go into the archives or should this update always be available to people visiting my site no matter how far in the future it is.
If the answer to that question yes then your update should be a post. If not then it should be a page.
Pages are outside of chronology and dictate your main navigational tabs and their hierarchy. If the update you are wanting to make is dependent upon timing then you need to be adding a post rather than a page and you should read the Adding Posts Tutorial instead.
Make sure you are logged in to your admin area. Click here if you are not sure how to do this.
- From any screen you may be working in you can click on the pages menu button on the left or hover over it for more options.
- When you click on the pages menu link it will bring up a list of pages that are already on your site.
- Beware that this list is paginated so if you have more than 10 pages total some might be on additional admin pages
- You can navigate through at the top or bottom of the list on the right side.
- You can also use the search form on the upper right to find the page you are needing to edit.
- To edit any of the existing pages simply click on the title of the page you want to edit. For this tutorial we will be adding a new page, but to edit an existing one is pretty much the same process.
- To add a new page you would click an "add new" button - these are in several different places for your convenience; a specific place is on the left side menu under All Pages.
- When the admin page loads you have several different areas or fields that you can work with. Each one displays content on the web page that it creates on the front end in different ways.
- The first field is the title - name your page something simple. About Us or services etc. Keep it short because your title will be used in navigation links and your menu which is typically pretty limited on space depending on the layout you chose.
- The next field is the main body content of the page. Here you can add as much information as you need to build your page. You have rich text formatting options such as bold and italicize. It is similar in usage to the word processor you have used for years.
- You can also add images, videos, music, documents and even links to your page using the add media or add link dialogs which is explained further in the tutorial named Adding and Editing media.
- Lets assume you are happy with the content you have added and are ready to add it to the website. To make it live you click the blue publish/update button on the upper right. You can then click the view page button to see the results.
- Feel free to go back and edit as much as you need to get the desired results... you cannot break this system beyond the point that your-web-guys cant fix it so feel free to play with it and see what different things do.
These are the most important fields to work with. There are many other dialog boxes or panes which we will cover in other tutorials or that may be so specific to your site we will instruct you on them individually.
If you have any trouble with this process, please send us a support email we are always happy to help.
On the front end of your website, a parent page will have a list of it's child pages displayed below the content in a formatted list which typically includes a picture, the title, a read more link, and a snippet of text from the content of the child page. This tutorial will help you make changes to this list.
- Make sure you are logged in to your admin area. Click here if you are not sure how to do this.
- Click on the pages link on the left side menu in your admin area.
- Beware that this list is paginated so if you have more than 10 pages total some might be on additional admin pages
- You can navigate through at the top or bottom of the list on the right side.
- You can also use the search form on the upper right to find the page you are needing to edit.
- To Change the image next to the child page.
- The picture is created from the first image that the system finds on the child page. Sometimes though this is not the best image to use for verious reasons. If this is the case you can specify an image for the system to use by adding a featured image which will be used instead.
- To add a featured image we go back to the main list of pages on your website and then click on the title of the page you want to work with from the list of pages. Once the edit page feilds load, click on the set featured image link in the featured image pane.
- When you do, the set featured image dialog box will open up. It is very similar in looks and functionality to adding an image to the content of a page or post. For detailed instructions on working with images you should watch the video titled adding media
- To change the snippet of text before the read more link
- By default the system will use X number of words from the beginning of your main content for this. However many times that text is not as precise or sisinct as you might want it to be.
- To edit what is displayed we go back to the main list of pages on your website and then click on the title of the page you want to work with from the list of pages
- Below the main content area there are various control panels. Each installation is different, but all of them have a SEO Options panel by default in that area.
- This panel is primarily for Search Engine Optimization which we will cover in a different tutorial, however the description field also effects the child list and what is displayed.
- Add to this field what you want displayed in the snippet of text.
- Click the blue button in the upper right that says Update and you will see that content displayed instead of the first few words of the page.
- To change the order your pages are displayed
- Read the tutorial titled Navigation and Hierarchy
If you have any trouble with this process, please send us a support email we are always happy to help.
As mentioned before pages are hierarchical in nature which means they can have children or parents as the case may be. You will know which page has children and grand children by seeing the dash to the left of the title. One dash indicates a child, two denote a grand child, three a great grandchild, etc... We will go over how to make changes in your navigational higherarchy in this tutorial.
- Make sure you are logged in to your admin area. Click here if you are not sure how to do this.
- Click on the pages link on the left side menu in your admin area.
- Beware that this list is paginated so if you have more than 10 pages total some might be on additional admin pages
- You can navigate through at the top or bottom of the list on the right side.
- You can also use the search form on the upper right to find the page you are needing to edit.
- To make a child or grandchild page.
- First click the title of the page you want to change.
- On the the page that loads there is a panel on the right side that says "Page Attributes".
- One of the attributes is the parent with a drop down box.
- Click on the drop down box and select the title of the page you want to make the parent of the page you are on currently.
- There is no limit to the number of generations you can have, but keep in mind that each generation takes another click for your users to make to find the information they are looking for so keep it under control.
- A good rule of thumb is to use the rules that you learned in high school regarding a good outline and you should have the makings of a good website hierarchy.
- To change the order in which the pages are displayed
- On the main list of pages, you can simply drag and drop the order you want your pages displayed
- This will effect the order on any drop down navigation menus as well as the list of child pages on the parent page. For more on effecting the way your child pages are displayed, click here.
- This can also change the hierarchy in lieu of the previous method by dragging and dropping new children into the list of existing ones below the parent
Please note that typically you will not want to add any first generation or top level pages to your website, but should rather only add children or other generations to the top level instead. This is because the navigation is normally set to a specific width to keep the layout looking nice. This doesn't mean you cannot add new pages, it's just that you will probably need your-web-guys to help make sure the alignment of your navigation bar does not get sideways with too many options.
If that is the case, simply send an email to support@yourwebguys.net and we will make the adjustments needed. However, additional generations or siblings of exisitng generations can be done to your hearts content.
If you have any trouble with this process, please send us a support email we are always happy to help.
You can add media including images, videos, and even pdf documents to any page or post of your website. Once you have added the item you can go back and change the way it is being displayed if you prefer. Here are step by step instructions for doing both;
- Make sure you are logged in to your admin area. Click here if you are not sure how to do this.
- Navigate to the page or post you want to add media to by clicking on the title from the post or pages list.
- To add an image to a post or a page.
- Place your cursor where you want the image to be displayed.
- Just above the main content area is a button that says "Add Media" click on it
- This will bring up the add media dialog box. Here you can upload new images from your hard drive by drag and drop or by selecting it manually. You can also select from images already uploaded in your media library.
- Once you have selected or uploaded the image or other file you want displayed new information will show up on the right side of the add media box, these are the settings you need to work with
- Title: This is the title of the image in the database, you can edit it but it is not necessary to change what is added automatically by the system
- Caption: this is exactly what you think of as a caption in a magazine. The text you add here will appear below where the image is displayed on the page
- Alt Text: For Search Engine Optimization you will want to put a sentence describing the picture with the keyphrase you are targeting in it.
- Description: This is for internal use so you can search your media library, it is not required.
- Media Tags: This is also for use in your media library, not required.
- Media Picker: Ignore this
- Attachment Display Settings
- Alignment: select the option for you want your image aligned. None will simply display the image in line with the text and is typically not the best way. Select left or right most of the time for the best aesthetic appeal.
- Link To: This is where you put the web address of the image or page you want to open when this picture is clicked on. Typically you will use none or media file. You might want to put a custom url in the field below, but this is not often used. Never use attachment page.
- Size: The system will re-size each image uploaded three different sizes minimum. In this drop down box you will see the name of the size and the pixel dimensions. You can select any option, however most of the time the medium size will be the best. Thumbnail crops the image and is mostly used in image galleries. Large and Full sized are typically too large for most pages, but feel free to use them if you like.
- Once you are happy with those settings, click the insert button below and your image should be added to the page as you indicated.
- To edit an image you have already added
- Click on the image you want to edit, then click on the edit button that appears
- When you do the edit image dialog box will appear
- The settings are similar to the add media dialog box in the previous section.
- To delete an image you have already added
- Simply click on the image and click the delete button that appears.
- DO NOT use the delete button on your keyboard. This will leave extraneous code and should be avoided
If you have any trouble with this process, please send us a support email we are always happy to help.
Posts are chronological in nature and are not included in the regular navigation menus. If the update you are wanting to make should never go into the archives then you need to be adding a page rather than a post and you should read the adding pages tutorial instead.
Make sure you are logged in to your admin area. Click here if you are not sure how to do this.
- From any screen you may be working in you can click on the posts menu button on the left or hover over it for more options.
- When you click on the posts menu link it will bring up a chronological list of posts that have already been published.
- Beware that this list is paginated so if you have more than 10 posts total some might be on additional admin pages
- You can navigate through at the top or bottom of the list on the right side.
- You can also use the search form on the upper right to find the post you are needing to edit.
- To edit any of the existing posts simply click on the title of the post you want to edit. For this tutorial we will be adding a new post, but to edit an existing one is pretty much the same process.
- To add a new post you would click an “add new” button – these are in several different places for your convenience; a specific place is on the left side menu under All Posts.
- When the admin page loads you have several different areas or fields that you can work with. Each one displays content on the web page that it creates on the front end in different ways.
- The first field is the title – name your post something simple. Think of it as a newspaper headline - you want to get the point across, but not be too wordy.
- The next field is the main body content of the page. Here you can add as much information as you need to build your page. You have rich text formatting options such as bold and italicize. It is similar in usage to the word processor you have used for years.
- You can also add images, videos, music, documents and even links to your page using the add media or add link dialogs which is explained further in the tutorial named Adding and Editing media.
- Lets assume you are happy with the content you have added and are ready to add it to the website. To make it live you click the blue publish/update button on the upper right. You can then click the view page button to see the results.
- Feel free to go back and edit as much as you need to get the desired results… you cannot break this system beyond the point that Your-Web-Guys can't fix it so feel free to play with it and see what different things do.
- Make sure you select a category to display the post in or else it will default to the News & Updates category automatically. For more on categories and how to use them read the tutorial entitled Working With Categories
These are the most important fields to work with. There are many other dialog boxes or panes which we will cover in other tutorials or that may be so specific to your site we will instruct you on them individually.
If you have any trouble with this process, please send us a support email we are always happy to help.
Make sure you are logged in to your admin area. Click here if you are not sure how to do this.
Also make sure you are familiar with adding and editing posts
Because posts are chronological in nature, we have to know where the most recent ones should be displayed on your website and how to archive them. This is done through categories. Categories can be free form if you are using a blog on your website or you can use them to display different posts on different pages of your website, or you can use categories to do both.
How to add a post to a category or categories
- When editing or creating a post, there is a panel on the right side of the main content area titled Categories
- Each category you have used on your website will be listed with a checkbox next to it.
- Simply click on the checkbox next to the category you want the post to be displayed within.
- A post can be displayed in one or many categories, it is up to you where you want it to show up.
- The News & Updates category that is displayed on your home page is the default category if you do not select any others
Creating a new category
- In the same Category panel as described above, click on the "+Add new category" link below the list of existing categories.
- That will open up a text box for you to enter the name of the new category
- you can select the parent category of the new one if you like, but this is not needed unless you are adding a new category to your blog. Then it should be added as a child of the Blog category
Using categories to display posts on a specific page
- News Posts
- You can add posts onto any page of your website by adding it to the category named the page name plus the word "news".
- For instance, to display a post on the about us page, you would create or click on the category named About Us News.
- You might want to do this when your company wins an award or to display a post about a personal accomplishment on an individual's bio page if you have them.
- In-Line Posts
- You can also add posts to any page of your website by adding it to the category named the same as the page you want it to show up on.
- For instance, a page named Board of Directors can list past boards of directors in a post category named "Board of Directors"
- You might want to do this for teams, memberships, or any other chronological item that is not exactly "news".
- Blog Posts
- Your blog is going to cover a wide range of topics. To make sure your visitors can easily find the posts they are interested in your blog should be categorized.
- You can add new categories to your blog by creating a new category as a child of the Blog category.
- This will make sure your posts are displayed in the main blog page as well as any specific categories you might also want your blog broken into.
If you have any trouble with this process, please send us a support email we are always happy to help.
Make sure you are logged in to your admin area. Click here if you are not sure how to do this.
The promo-slider is typically the first and largest thing visitors to your website will see. That makes it the most important piece of real-estate you have. To make use of this you should use your promo slider as exactly that, a promotional area.
Because promotions are, by nature, time sensitive, logically the slides should be attached to posts rather than pages or some other type of post. So to begin, we will assume you know how to add and edit a post, if you do not please read the posts tutorial first.
Adding a new promotional slide
- From any screen you may be working on, hover your mouse over the posts menu item on the left then select Add New from the menu items that appear.
- Create a post about your promotion as you would normally. Talk about who, what, when, and where the thing you want to draw attention is about.
- Below the main content area you will see what is known as the dynamic panel. Typically the default panel displayed is the SEO Options panel, but we need to load the promo panel. Here's how:
- In the upper left corner of the panel you will see a drop down menu next to a button that says "Load"
- click on it and select "Promotions"
- click the load button
- The promo panel should load
- In the promo panel there are several fields. Each one does something specific. The only one that is required to make a slide is the promo-image, the rest are optional
- Please note: Each layout we use is different so your specific settings may differ somewhat from what is explained below. Ask Your-Web-Guy for specifics of your website if you see something different
- promo-image - This is the slide image itself. There are two ways to select the image to be used. You only need to use one method, not both.
- The instructions for the field should have the specific pixel dimensions that your website uses for the promo-slider. Make sure the image you use is at least those dimensions. If it is larger, the system will re-size it. Remember it will crop excess from the sides or top and bottom depending on if it is too wide or too tall.
- The choose file button allows you to upload a new image from your hard drive.
- When you click it a file browser dialog will open up.
- Select the image from your hard drive and click open.
- The file will be uploaded to your website and added to the media library.
- The dialog box will disappear and a small thumbnail of the image you chose will appear below the choose file button
- The media picker link allows you to select a file already in your media library.
- Click on it to open a list of images in your media library.
- When you have found the image you want to use click the "Show" link
- In the dialog that appears simply click the "Use This" link next to the words Media Picker
- The dialog box will disappear and a small thumbnail of the image you chose will appear below the choose file button
- promo-link - this is used to create a "Read More" link on the slide
- You can enter a web address such as https://www.your-web-guys.com which will link the Read More text to that web address so when someone clicks on it they are taken to that web page.
- You can simply type the word "self" in this field to make the read more link go to the post you have created above.
- You can leave it blank and have no Read More text at all on this particular slide
- promo-float - how the text will be displayed on top of the slide image. Select left, right, or center to have the text aligned in that way.
- promo-text - the text that is displayed on top of the slide next to the Read More button if there is one.
- This field has rich text formatting available which means you can add bold, italic, and other formatting to the text in this field
- Keep it short, typically the text in this field is relatively large similar to a headline in a newspaper so be concise but descriptive to draw users to the read more link
- Once you are happy with the settings and content you have entered, click the blue publish button on the upper right to make both the post and the slide view-able to your visitors.
Click here to see the tutorial on how to edit an existing slide
If you have any trouble with this process, please send us a support email we are always happy to help.
This tutorial assumes you know how to add slides to your promo slider. If you do not please see our tutorial on Adding Slides to Your Promo Slider first
The slides in your promo slider are unlimited and do not expire automatically. Because of this, you will want to remove or edit them at times. Here is how you do so:
To find the posts that have slides associated with them
- Make sure you are logged in to your admin area. Click here if you are not sure how to do this.
- From any screen you may be working on, click the Posts menu item on the left.
- When you click on the posts menu link it will bring up a chronological list of posts that have already been published.
- Beware that this list is paginated so if you have more than 10 posts total some might be on additional admin pages
- You can navigate through at the top or bottom of the list on the right side.
- You can also use the search form on the upper right to find the post you are needing to edit.
- On the left of the list of posts there is a column titled Promo Slider, a green checkmark will be next to the title of any posts that have slides associated with them.
To edit a slide
- To edit any of the existing slides simply click on the title of the post next to the green checkmark to bring up the edit post page.
- Scroll to the Promotions panel below the main content area.
- If you do not see the promotions panel, click the drop down menu on the upper left corner of the panel directly below the main content area
- Select Promotions and click the load button
- Make any edits to the fields you need
- Click the blue update button in the upper right corner to commit the edits
To delete a slide
Because we do not want to ever delete a post completely as search engines may be sending traffic to it, you only want to delete the slide. To do this you only need to delete the slide associated with the post, not the post itself.
- Simply click on the title of the post next to the green checkmark to bring up the edit post page.
- Scroll to the Promotions panel below the main content area.
- If you do not see the promotions panel, click the drop down menu on the upper left corner of the panel directly below the main content area
- Select Promotions and click the load button
- In the promo-image field, click the checkbox next to the thumbnail of the slide image.
- Click the blue update button in the upper right corner and the slide will be removed, but the post will remain.
If you have any trouble with this process, please send us a support email we are always happy to help.
Once you have created your web page or your blog post in our CMS it is time to optimize it for search engine traffic. If you have already determined what keyword/phrase you want to focus on then you are ready to use this tutorial. If you have not, please click on the links in the previous statements to get caught up then come back here.
The thing to remember overall is that google (and all search engines) like repetition, but not copy and pasting. This is referred to as keyword density. There are lots of different opinions on what specific percentage you should use, but none are considered best practices and there is lots of debate as to which is the correct number. We believe that when there is no consensus, you should use a rule of thumb.
The best rule of thumb would be to phrase your content in a way that might seem odd when read. In other words, if you read your content and you think to yourself "if i hear dallas dentist office one more time i am going to loose my mind", then you are using it too often. If you read your content and you don't notice the keywords at all, then you are using it too little. If you read your content and you think to yourself "that is an odd way to write that" then odds are it is perfect.
In addition to that rule of thumb you also have the opportunity to add some keyword density through media on the page and the metadata contained within. Below is how our system allows you to manipulate the metadata throughout your site with a simple recipe.
In the SEO Options panel, just below the main content area of the edit post/page dialog on your administrative back end enter the following:
- in the first field, enter the keyword or phrase that you are targeting for this update. Click here for help on how to determine which keyword/phrase to use
i.e. Dallas dentist office - h1 field - write a sentence with the keyword or phrase in it.
i.e. Dentists office in the Dallas Area - Description field - write another sentence with the keyword/phrase in it again, but rearranged this time.
i.e. Great Dentist in an office in dallas - keywords field - this field is not really needed anymore. Most search engines dont look at this meta tag because it was so badly abused in the past. However, that could change at any moment so it is not a bad idea to use it. It just probably wont make a difference any time soon.
- seoblockquote field - Here you should enter a paragraph with your keyword/phrase in it a couple of times. Remember to rearrange the words to make them different than before, but just a couple of sentences should do the trick
Once you have all that in place, your content is ready to be published. Now all you need to do is figure out when publication would work best, here is what we suggest.
Before you even start writing a web page or your blog post in our CMS, you need to determine which keyphrase or keyword you want to focus on for search engine traffic. Once you have determined your keyword/phrase, you can create your page or post as normal, then optimize the content and the media to match. Here is how to determine which keyword or phrase you should use:
Option 1, ask google
One of the great things is that if you want to know how to get more attention from google, you just have to google it. They will tell you everything you need to know to get traffic from them. One of the greatest tools they provide is the keyword suggestion tool in google adwords. You will need an adwords account, but creating one is easy and free. Even though they will try to convince you to purchase pay per click packages, we advise you not to. Just use the tool instead.
- login to adwords by clicking the link above
- if you don't get to the keyword planner tool initially, click on tools in the navigation bar and select keyword planner from the drop down menu
- under [Find new keywords and get search volume data] click on the first option titled "Search for new keywords using a phrase, website or category"
- this will open up a form where you can enter different information. These fields are pretty self explanatory and have help icons you can click on for more detailed information so we will not go over them all here. Fill out the form with what you want to determine and click [get ideas]
- The new page will show lots of different options and ways to drill down to find the information you want, but if it gets overwhelming, just let us know and we will walk you through it.
- The important thing to look at is the keyword ideas table in the middle of the page. The table is like a spreadsheet with the following columns:
- keyword
- ave. monthly searches
- competition
- suggested bid
- ad impr. share
- add to campaign
- the first three columns are what you are after. Find a keyword that is high in monthly searches, but low in competition. That is the keyword you want to use for your content.
They change this tool quite a bit so these instructions might not be correct when you read them. If that is the case, let us know in a support ticket and we will walk you through it personally.
Option 2, ask google... in a different way
All of the sites we build include google analytics tracking. You can use this tool to find what keywords your site is getting traffic from as a starting point before using the adwords tool above. You should also use this tool to see what results your efforts have brought so you can adjust your focus accordingly in the future. Again, this tool is very robust and powerful to the point that it is hard to handle if you aren't used to working with it. We are, so don't hesitate to ask us to help you navigate the use to get the information you need.
- login to analytics here
- click on the all website data link under your company name (if you don't see statistics initially)
- in the left menu, click aquisition, then search console, then queries
- this will show you what keyphrase was used to find your site in the time period you indicated.
The first row is always going to be (not set) because as privacy concerns have increased, there are instances where google will simply not log what keyphrase was used to find your site. Typically though, that is just an amalgam of the other keywords below so simply ignore it.
Because keyword density is so important to get right (you dont want too much but you also dont want too little) you need to use every opportunity to add keywords without looking spammy. One great way to do that is through media on your post or page. Hopefully you have already reviewed, or are familiar with adding and editing media to your content. In addition to the normal way of adding an image, you want to follow these additional steps to ensure your image(s) are correctly optimized with the keyword you have determined for your update and that you have optimized the update for.
Step one, find an image that matches your content.
Simply doing a search in google images for the keyword you are using and downloading someone else's image to use isn't a great idea, although it probably wont be a big issue if you decide to (we just didn't tell you to do it). The better idea is to find a royalty free stock photography supplier where you can find the image you need and purchase the rights to it pretty inexpensively. We recommend 123rf.com as the smallest image size they provide, which is all you need for this kind of thing, is only about a dollar.
Step two, adding it to your content
The normal process of uploading an image to be used in the update is fine, just dont complete the process until you have finished the next step. Select a spot near the top or even multiple places for additional images if your content is long enough.
Step three, optimizing it to suit your keyword
once you have uploaded the image, make the following modifications in the attachment details panel on the right side of your screen:
- Title: Edit this to have your keyphrase/word in it. Very few people will see this content, but googlebot certainly will.
i.e. Dental Waiting Room in our Dallas Office - Caption: This will show up under the image on the web page you are creating. Keep it readable, but try to include the keyphrase again in another order
i.e. View of our Dallas office waiting room in our dental practice. - Alt Text: This is for things that don't have sight. I say things, because googlebot and other search engine robots can't see. All they can do is gather data and a bunch of pixels don't look like a picture to a robot... they are just a bunch of pixels. So the alt tag is a great place to add another instance of keywords into your update. Just another sentence with the phrase in it rearranged just like before. This one can be seen by people, but not as obviously as the caption.
i.e. Image of dallas dentist office waiting room
Now, insert the image just like you would normally.
Because search engines need your content more than anything else, the various algorithms that they use all have one thing in common... they all want new content added on an ongoing basis. To make sure you provide the content they want in a routine fashion we suggest two things;
#1 create an editorial calendar
Having a plan to target specific keywords/phrases on a regular basis is key. Using one of the templates below, you can create an editorial calendar that will help keep your plan organized and on target. Your editorial calendar should include simple information about each of these projects:
- Title or description of the content
- Links to supporting documents, like content briefs
- Author or writer
- Deadline
- Channels you will promote it on (don't forget, search engine optimization goes hand in glove with social media)
The following is a very basic template of an editorial calendar which we got from this article on the Hootsuite Blog. You should add columns or rows as required.
#2 Pre Post your updates
Using your editorial calendar does not have to be a day to day thing. You can create it, then schedule the updates you write to be published automatically on a future date through your website. If you have opted to have our social media setup done as well, then your social media platforms will also get the update over time. Here is how you do it:
- Create and optimize a blog post as usual, but dont click on the blue publish button
- just above the blue publish button you will see a calendar icon with the words [Publish immediately] and an edit link next to it. Click on the edit link
- this will reveal date and time fields that you can edit to your liking. Set the date into the future and click okay
- that will change the publish button into a schedule button. Click on it and your post will go out automatically at the time and date you specified.
You can create and schedule your entire month, quarter or even year of updates all at one time using this technique. Then you simply do what you do best... build your business while your website published updates to get the search engines attention.
Some (and soon all) sites that Your-Web-Guys host have much of their content served through a CDN. CDN stands for Content Delivery Network. From the cloudflare website
A content delivery network (CDN) refers to a geographically distributed group of servers which work together to provide fast delivery of Internet content.
A CDN allows for the quick transfer of assets needed for loading Internet content including HTML pages, javascript files, stylesheets, images, and videos. The popularity of CDN services continues to grow, and today the majority of web traffic is served through CDNs, including traffic from major sites like Facebook, Netflix, and Amazon.
If you have ever wondered why websites like Facebook and Amazon load so quickly, its because they have much more money than you 🙂 But also because they use CDN's and now Your-Web-Guys Clients do too... at no additional charge.
Only problem is that a Cache of your website is saved on the CDN so that it can be delivered quickly. That means that if you make an update to your website, and the cache is not updated at the same time, then you wont see those changes right away.
We have a solution for this.
There is a plugin that we use that integrates with Cloudflare's API that automatically updates the cache whenever you update your website. If you see the information shown in the screenshot to the right then your website has been updated with this fix and it should be working automatically. You can see this screen in your website admin area by clicking on Settings > Cloudflare as indicated by the purple arrows.
If you are still not seeing the updates you make then there is a possibility that the API is having trouble at that specific moment. Odds are it will pass and in a few hours you will see the updates. If that is not soon enough, send us a support request by logging into your Client Control Panel or simply sending an email to support@your-web-guys.com and we will manually clear the cache for you
This tutorial assumes you are familiar with adding and editing both posts and pages. If you have not already done so, please make sure you have read and understand both the adding and editing pages as well as adding and editing posts tutorials as the information contained here is applicable to both functions.
The text editor has one line of icons visible by default. This line typically has all the formatting options you will typically need. However, there are times when you need additional formatting options such as different font color or indenting options. To toggle visibility of those buttons, you will need to activate the advanced text editing icons row. Click on the icon which looks like a bunch of buttons in boxes at the end of the row of icons you see. It should look something like the image below:
Social Media Tutorials
When you have us customize or manage your Facebook page we will need administrative access to it. However, we don't want to have your password for obvious security reasons. Facebook has created a process where you can assign multiple administrators to your page. Here is how you assign Your-Web-Guys administrative access:
- Login to your Facebook page
- Make sure you are using facebook as your business page, not your personal profile
- If you are not, then click on the name of your company on the page list on the left side of the page you are on
- When you are using Facebook as your company, you will see a "Settings" button toward the top, click on it
- On the page that loads, click on the "Page Rolls" menu button on the left
- You should see your name as an administrator, in the next box enter this email socialmedia@your-web-guys.com
- Just underneath that box, click the link and select Admin
- Then click save
- It will ask you to re-enter your password for security reasons so go ahead and enter it.
You might get a notification that the user you entered must like your page first. If that is the case, send us an email at support@your-web-guys.com letting us know and we will follow up with further instructions.
When you have us customize or manage your Google+ business page we will need administrative access to it. However, we don’t want to have your password for obvious security reasons. Google has created a process where you can assign multiple administrators to your page. Here is how you assign Your-Web-Guys administrative access:
- Login to Google+ by clicking here
- Access your page management options by selecting Pages from the Google+ main navigation (the drop down menu just under the Google+ logo in the upper left corner of your browser window)
- Click on the blue button that says Manage this Page
- You are now using Google+ as that page. Click the main navigation menu again and select Settings
- You should see four tabs across the top, just below the search bar; Settings, Connected Services, For your site, and Managers
- Click Managers to bring up a list of your managers
- Click Add manager, enter socialmedia@your-web-guys.com , and click Invite.
That should be it! We will be notified of the invitation and complete the needed steps
You can now link your YouTube channel to a Google+ page—one that can use a business or other name. You can start the process by going to your advanced account settings and clicking Connect with a Google+ page. You'll be presented with a few options:
The option you choose will become the new name for your YouTube channel.
- Your Google+ pages, If you have any
- If you already have any Google+ pages, you'll see them listed here. If you choose one of these, your YouTube channel will be renamed to match the page. If the Google+ page has any other managers, they will be able to manage the channel as well.
I have a Google+ page, but it doesn't show in the list! This means that your YouTube channel's Google Account is not a manager of that Google+ page. You'll need to add your Google Account as a manager of the page.
- If you already have any Google+ pages, you'll see them listed here. If you choose one of these, your YouTube channel will be renamed to match the page. If the Google+ page has any other managers, they will be able to manage the channel as well.
- Your current YouTube username. This will set up a new Google+ page for your channel with the same name. Your YouTube name won't change.
- "Choose a better name" lets you enter a new name. This will set up a new Google+ page for your channel with that name. There are no name restrictions—get the name you always wanted!
- If you have a Google+ profile, the last option will let you link your channel with your Google+ profile instead of a page. If you're not sure, learn more about whether to choose a profile or a page.
Once you've chosen a page option, click Next and that's it - your YouTube channel is now linked with your Google+ page.
Here’s a quick guide on how to log into your Facebook account.
First, open your browser, type in www.facebook.com. Hit “Enter”.
Log in to Facebook as you normally do. Once logged into your personal profile you can control your business' Facebook page.
On the left side menu you will see a heading called "Pages" under which you should see your company's page. Click on it and you will be taken to your company's Facebook page.
Now you can add updates, and do other administrative tasks on your page. However, doing more "social" tasks such as liking or commenting on other pages/profiles takes another step.
To do those more "social" activities you must use facebook as your page, not your profile. To do this, click on the drop down menu (the down arrow icon) in the upper right corner of your screen. Select your company page under the "Use Facebook As:" header.
Now you can use facebook as you would normally, but all the activity you do will be as your company rather than your personal profile.
First, open your browser. Now go to www.twitter.com.
Now make sure no one else is logged in on your computer. If someone else is logged into Twitter on this computer, log them out by clicking the gear icon in the upper right hand corner, and then choosing “Sign Out”.
Now go back up to the top right of the page, and click “Sign In”
On this next page, enter your username and password. If you are the only person who uses this computer, or you have a password protected profile, you can click the box labeled “Remember me”. Since I am not the only one who uses this computer, I am not going to click this box.
And the last step is to click Sign In.
If you do not remember your username or password you can retrieve it by clicking on the "Forgot Password" link below the form. Remember, unless you changed the email address after we set up your page, the email on file with twitter will be socialmedia@[your domain name].
In a nutshell, a hashtag is the pound sign on your keyboard placed directly in front of any word or phrase. What this does, is it makes this word more easily searchable. You can use hashtags in several ways.
Even though hashtags are most commonly associated with twitter, they can also be used in a myriad of other platforms, including your website! But to demonstrate how to use a hashtag lets go to twitter and follow these steps to learn more:
- Go to www.twitter.com.
- You should see in the top area that there is an empty search field. Here you can look for people, topics, and hashtags.
- Try searching for people talking about their lawn for example. If you are a lawn and garden business, you can repeat this search on twitter to find out trends, respond to people talking about your area of expertise, people asking questions about lawns, and people who you can follow.
- So try typing in #lawn. As you can see, there are many search results. From here, you can to scan these people’s messages to find new people to follow and talk to. This helps build your online community, and brings you new customers.
Now, try flipping it and post a message using the hashtag lawn. That way, if anyone is looking for information, and searches #lawn... your tweet will appear. This increases the likelihood of relevant customers finding you
So if you were a lawn and garden business you could offer a special to your Twitter followers.
This week only, we’re offering $10 off our #lawn mowing service. Mention Twitter when you book your appointment!
This is just a quick example. There are many different hashtags that are relevant to your business...including the neighborhood, city, state, and industry keywords. We recommend you do a search to familiarize yourself on how others use these hashtags!
A whitelist is a list of email addresses that you want to receive email from. By adding an address to your whitelist, you are telling the email system not to filter email from that address. Follow the instructions below to add our email address(s) or any other address to your whitelist.
Here are the instructions for some of the most popular email programs:
AOL
You will need to add our "From addresses", support@your-web-guys.com & socialmedia@your-web-guys.com to your AOL address book:
- Click the Mail menu and select Address Book. PROBLEM: AOLuot;Address Card for New Contact" window to load.
- Once loaded, cut and paste support@your-web-guys.com into the "Other E-Mail" field.
- Make our From address the "Primary E-Mail" address by checking the associated check box.
- Click the Save button.
- Repeat the process with the socialmedia@your-web-guys.com address.
Yahoo!
You will need to set up a filter to redirect our mailing into your inbox:
Open your mailbox and click on Mail Options (upper right hand corner).
- Select Filters (bottom left corner).
- Click the Add link on the Filters page.
- Update the "From headerUpdate the "From header:" rule with the following 2 pieces of information: "contains" and 'your-web-guys.com'. This essentially allows the mail server to identify our mailing based on the email From address.
- Click the Choose Folder pull down menu and select inbox.Add Filter button.
Hotmail
You will need to add our From addresses, support@your-web-guys.com & socialmedia@your-web-guys.com , to your Hotmail Safe List:
- Open your mailbox and click “Options” (upper right hand corner).
- Click the “Junk E-Mail Protection” link (top of page).
- Select the “Safe List” link (2nd from bottom).
- Copy and paste support@your-web-guys.com the dialog box titled “Type an address or domain”.
- Click the “Add” button next to the dialog box.
- Repeat the process for the socialmedia@your-web-guys.com address.
Gmail
You will need to add our From addresses, support@your-web-guys.com & socialmedia@your-web-guys.com, to your Gmail Contacts List:
- Click Contacts along the left side of any Gmail page.
- Click Add Contact.
- Copy and paste our From address, support@your-web-guys.com into the primary email address dialog box.
- Click Save.
- Repeat the process with the socialmedia@your-web-guys.com address.
Mozilla Thunderbird
You will need to add our From addresses, support@your-web-guys.com & socialmedia@your-web-guys.com , to your Thunderbird Address Book and configure your Junk Mail Controls to whitelist your address book.
Add our From address into your Personal Address Book:
- Click the Address Book button.
- Make sure the Personal Address Book is highlighted.
- Click the New Card button. This will launch a New Card window that has 3 tabs: Contact, Address & Other.
- Under the Contact tab, copy and paste our “From” address, support@your-web-guys.com into the Emaildialog box.
- Click OK.
- Repeat the process with the socialmedia@your-web-guys.com address.
Outlook 2003
You will need to add our From addresses, support@your-web-guys.com & socialmedia@your-web-guys.com to your Safe Senders list:
- On the Tools menu, click Options.
- On the Preferences tab, click Junk E-mail.
- On the Safe Senders tab, click Add.
- In the Add address, copy and paste in our From address, support@your-web-guys.com
- Click OK.
- Repeat the process with the socialmedia@your-web-guys.com address.
Make Us Your-Web-Guys Today
 Step 1: Tell us about your business
My company...
