CMS Tutorials
- go to http://www.[yourdomain]/admin
- Your username and password were entered at training, enter them here.
- If you do not remember your user name and password, click the "Lost your password?" link
- You can enter your username or your email address
- Your website will send you a link to create a new password in your email
- Click the link in the email and enter your new password
- You will be logged in after doing so
If you website is still in the production process (in other words, not published on your normal domain name)...
While in the production process, Your-Web-Guys should have sent you a specific url which you can use to review your website before it is published. This url, or web address, should look something like this:
To access your admin area for your site admin area, you need to add /admin to the end of that url... like this:
The rest of the login instructions are the same once you have the correct url.
If you did not get this temporary url, please send us a support email
Make sure you are logged in to your admin area. Click here if you are not sure how to do this.
Now that you are logged in you will see the Your-Web-Guys Dashboard. This will show you a quick snapshot of information about your website. On the left side you will see several different menu options. Each one does different things with your website, but for updating you will only need to deal with two of them most of the time. These are posts and pages.
The difference between the two is that posts are chronological in nature and pages are outside of chronology and higharcal. In other words a post is going to get old at some point in the future while pages have child and grand child pages in a hierarchy which are always visible.
Some good examples of posts would be promotions, events, and other news items.
Pages are more like what you think of as a webpage... an about us page or contact us page - information that should always be available no matter how old it is.
The most important question you should ask yourself is:
In other words does it ever need to go into the archives or should this update always be available to people visiting my site no matter how far in the future it is.
If the answer to that question yes then your update should be a post. If not then it should be a page.
Pages are outside of chronology and dictate your main navigational tabs and their hierarchy. If the update you are wanting to make is dependent upon timing then you need to be adding a post rather than a page and you should read the Adding Posts Tutorial instead.
Make sure you are logged in to your admin area. Click here if you are not sure how to do this.
- From any screen you may be working in you can click on the pages menu button on the left or hover over it for more options.
- When you click on the pages menu link it will bring up a list of pages that are already on your site.
- Beware that this list is paginated so if you have more than 10 pages total some might be on additional admin pages
- You can navigate through at the top or bottom of the list on the right side.
- You can also use the search form on the upper right to find the page you are needing to edit.
- To edit any of the existing pages simply click on the title of the page you want to edit. For this tutorial we will be adding a new page, but to edit an existing one is pretty much the same process.
- To add a new page you would click an "add new" button - these are in several different places for your convenience; a specific place is on the left side menu under All Pages.
- When the admin page loads you have several different areas or fields that you can work with. Each one displays content on the web page that it creates on the front end in different ways.
- The first field is the title - name your page something simple. About Us or services etc. Keep it short because your title will be used in navigation links and your menu which is typically pretty limited on space depending on the layout you chose.
- The next field is the main body content of the page. Here you can add as much information as you need to build your page. You have rich text formatting options such as bold and italicize. It is similar in usage to the word processor you have used for years.
- You can also add images, videos, music, documents and even links to your page using the add media or add link dialogs which is explained further in the tutorial named Adding and Editing media.
- Lets assume you are happy with the content you have added and are ready to add it to the website. To make it live you click the blue publish/update button on the upper right. You can then click the view page button to see the results.
- Feel free to go back and edit as much as you need to get the desired results... you cannot break this system beyond the point that your-web-guys cant fix it so feel free to play with it and see what different things do.
These are the most important fields to work with. There are many other dialog boxes or panes which we will cover in other tutorials or that may be so specific to your site we will instruct you on them individually.
If you have any trouble with this process, please send us a support email we are always happy to help.
On the front end of your website, a parent page will have a list of it's child pages displayed below the content in a formatted list which typically includes a picture, the title, a read more link, and a snippet of text from the content of the child page. This tutorial will help you make changes to this list.
- Make sure you are logged in to your admin area. Click here if you are not sure how to do this.
- Click on the pages link on the left side menu in your admin area.
- Beware that this list is paginated so if you have more than 10 pages total some might be on additional admin pages
- You can navigate through at the top or bottom of the list on the right side.
- You can also use the search form on the upper right to find the page you are needing to edit.
- To Change the image next to the child page.
- The picture is created from the first image that the system finds on the child page. Sometimes though this is not the best image to use for verious reasons. If this is the case you can specify an image for the system to use by adding a featured image which will be used instead.
- To add a featured image we go back to the main list of pages on your website and then click on the title of the page you want to work with from the list of pages. Once the edit page feilds load, click on the set featured image link in the featured image pane.
- When you do, the set featured image dialog box will open up. It is very similar in looks and functionality to adding an image to the content of a page or post. For detailed instructions on working with images you should watch the video titled adding media
- To change the snippet of text before the read more link
- By default the system will use X number of words from the beginning of your main content for this. However many times that text is not as precise or sisinct as you might want it to be.
- To edit what is displayed we go back to the main list of pages on your website and then click on the title of the page you want to work with from the list of pages
- Below the main content area there are various control panels. Each installation is different, but all of them have a SEO Options panel by default in that area.
- This panel is primarily for Search Engine Optimization which we will cover in a different tutorial, however the description field also effects the child list and what is displayed.
- Add to this field what you want displayed in the snippet of text.
- Click the blue button in the upper right that says Update and you will see that content displayed instead of the first few words of the page.
- To change the order your pages are displayed
- Read the tutorial titled Navigation and Hierarchy
If you have any trouble with this process, please send us a support email we are always happy to help.
As mentioned before pages are hierarchical in nature which means they can have children or parents as the case may be. You will know which page has children and grand children by seeing the dash to the left of the title. One dash indicates a child, two denote a grand child, three a great grandchild, etc... We will go over how to make changes in your navigational higherarchy in this tutorial.
- Make sure you are logged in to your admin area. Click here if you are not sure how to do this.
- Click on the pages link on the left side menu in your admin area.
- Beware that this list is paginated so if you have more than 10 pages total some might be on additional admin pages
- You can navigate through at the top or bottom of the list on the right side.
- You can also use the search form on the upper right to find the page you are needing to edit.
- To make a child or grandchild page.
- First click the title of the page you want to change.
- On the the page that loads there is a panel on the right side that says "Page Attributes".
- One of the attributes is the parent with a drop down box.
- Click on the drop down box and select the title of the page you want to make the parent of the page you are on currently.
- There is no limit to the number of generations you can have, but keep in mind that each generation takes another click for your users to make to find the information they are looking for so keep it under control.
- A good rule of thumb is to use the rules that you learned in high school regarding a good outline and you should have the makings of a good website hierarchy.
- To change the order in which the pages are displayed
- On the main list of pages, you can simply drag and drop the order you want your pages displayed
- This will effect the order on any drop down navigation menus as well as the list of child pages on the parent page. For more on effecting the way your child pages are displayed, click here.
- This can also change the hierarchy in lieu of the previous method by dragging and dropping new children into the list of existing ones below the parent
Please note that typically you will not want to add any first generation or top level pages to your website, but should rather only add children or other generations to the top level instead. This is because the navigation is normally set to a specific width to keep the layout looking nice. This doesn't mean you cannot add new pages, it's just that you will probably need your-web-guys to help make sure the alignment of your navigation bar does not get sideways with too many options.
If that is the case, simply send an email to support@yourwebguys.net and we will make the adjustments needed. However, additional generations or siblings of exisitng generations can be done to your hearts content.
If you have any trouble with this process, please send us a support email we are always happy to help.
You can add media including images, videos, and even pdf documents to any page or post of your website. Once you have added the item you can go back and change the way it is being displayed if you prefer. Here are step by step instructions for doing both;
- Make sure you are logged in to your admin area. Click here if you are not sure how to do this.
- Navigate to the page or post you want to add media to by clicking on the title from the post or pages list.
- To add an image to a post or a page.
- Place your cursor where you want the image to be displayed.
- Just above the main content area is a button that says "Add Media" click on it
- This will bring up the add media dialog box. Here you can upload new images from your hard drive by drag and drop or by selecting it manually. You can also select from images already uploaded in your media library.
- Once you have selected or uploaded the image or other file you want displayed new information will show up on the right side of the add media box, these are the settings you need to work with
- Title: This is the title of the image in the database, you can edit it but it is not necessary to change what is added automatically by the system
- Caption: this is exactly what you think of as a caption in a magazine. The text you add here will appear below where the image is displayed on the page
- Alt Text: For Search Engine Optimization you will want to put a sentence describing the picture with the keyphrase you are targeting in it.
- Description: This is for internal use so you can search your media library, it is not required.
- Media Tags: This is also for use in your media library, not required.
- Media Picker: Ignore this
- Attachment Display Settings
- Alignment: select the option for you want your image aligned. None will simply display the image in line with the text and is typically not the best way. Select left or right most of the time for the best aesthetic appeal.
- Link To: This is where you put the web address of the image or page you want to open when this picture is clicked on. Typically you will use none or media file. You might want to put a custom url in the field below, but this is not often used. Never use attachment page.
- Size: The system will re-size each image uploaded three different sizes minimum. In this drop down box you will see the name of the size and the pixel dimensions. You can select any option, however most of the time the medium size will be the best. Thumbnail crops the image and is mostly used in image galleries. Large and Full sized are typically too large for most pages, but feel free to use them if you like.
- Once you are happy with those settings, click the insert button below and your image should be added to the page as you indicated.
- To edit an image you have already added
- Click on the image you want to edit, then click on the edit button that appears
- When you do the edit image dialog box will appear
- The settings are similar to the add media dialog box in the previous section.
- To delete an image you have already added
- Simply click on the image and click the delete button that appears.
- DO NOT use the delete button on your keyboard. This will leave extraneous code and should be avoided
If you have any trouble with this process, please send us a support email we are always happy to help.
Posts are chronological in nature and are not included in the regular navigation menus. If the update you are wanting to make should never go into the archives then you need to be adding a page rather than a post and you should read the adding pages tutorial instead.
Make sure you are logged in to your admin area. Click here if you are not sure how to do this.
- From any screen you may be working in you can click on the posts menu button on the left or hover over it for more options.
- When you click on the posts menu link it will bring up a chronological list of posts that have already been published.
- Beware that this list is paginated so if you have more than 10 posts total some might be on additional admin pages
- You can navigate through at the top or bottom of the list on the right side.
- You can also use the search form on the upper right to find the post you are needing to edit.
- To edit any of the existing posts simply click on the title of the post you want to edit. For this tutorial we will be adding a new post, but to edit an existing one is pretty much the same process.
- To add a new post you would click an “add new” button – these are in several different places for your convenience; a specific place is on the left side menu under All Posts.
- When the admin page loads you have several different areas or fields that you can work with. Each one displays content on the web page that it creates on the front end in different ways.
- The first field is the title – name your post something simple. Think of it as a newspaper headline - you want to get the point across, but not be too wordy.
- The next field is the main body content of the page. Here you can add as much information as you need to build your page. You have rich text formatting options such as bold and italicize. It is similar in usage to the word processor you have used for years.
- You can also add images, videos, music, documents and even links to your page using the add media or add link dialogs which is explained further in the tutorial named Adding and Editing media.
- Lets assume you are happy with the content you have added and are ready to add it to the website. To make it live you click the blue publish/update button on the upper right. You can then click the view page button to see the results.
- Feel free to go back and edit as much as you need to get the desired results… you cannot break this system beyond the point that Your-Web-Guys can't fix it so feel free to play with it and see what different things do.
- Make sure you select a category to display the post in or else it will default to the News & Updates category automatically. For more on categories and how to use them read the tutorial entitled Working With Categories
These are the most important fields to work with. There are many other dialog boxes or panes which we will cover in other tutorials or that may be so specific to your site we will instruct you on them individually.
If you have any trouble with this process, please send us a support email we are always happy to help.
Make sure you are logged in to your admin area. Click here if you are not sure how to do this.
Also make sure you are familiar with adding and editing posts
Because posts are chronological in nature, we have to know where the most recent ones should be displayed on your website and how to archive them. This is done through categories. Categories can be free form if you are using a blog on your website or you can use them to display different posts on different pages of your website, or you can use categories to do both.
How to add a post to a category or categories
- When editing or creating a post, there is a panel on the right side of the main content area titled Categories
- Each category you have used on your website will be listed with a checkbox next to it.
- Simply click on the checkbox next to the category you want the post to be displayed within.
- A post can be displayed in one or many categories, it is up to you where you want it to show up.
- The News & Updates category that is displayed on your home page is the default category if you do not select any others
Creating a new category
- In the same Category panel as described above, click on the "+Add new category" link below the list of existing categories.
- That will open up a text box for you to enter the name of the new category
- you can select the parent category of the new one if you like, but this is not needed unless you are adding a new category to your blog. Then it should be added as a child of the Blog category
Using categories to display posts on a specific page
- News Posts
- You can add posts onto any page of your website by adding it to the category named the page name plus the word "news".
- For instance, to display a post on the about us page, you would create or click on the category named About Us News.
- You might want to do this when your company wins an award or to display a post about a personal accomplishment on an individual's bio page if you have them.
- In-Line Posts
- You can also add posts to any page of your website by adding it to the category named the same as the page you want it to show up on.
- For instance, a page named Board of Directors can list past boards of directors in a post category named "Board of Directors"
- You might want to do this for teams, memberships, or any other chronological item that is not exactly "news".
- Blog Posts
- Your blog is going to cover a wide range of topics. To make sure your visitors can easily find the posts they are interested in your blog should be categorized.
- You can add new categories to your blog by creating a new category as a child of the Blog category.
- This will make sure your posts are displayed in the main blog page as well as any specific categories you might also want your blog broken into.
If you have any trouble with this process, please send us a support email we are always happy to help.
Make sure you are logged in to your admin area. Click here if you are not sure how to do this.
The promo-slider is typically the first and largest thing visitors to your website will see. That makes it the most important piece of real-estate you have. To make use of this you should use your promo slider as exactly that, a promotional area.
Because promotions are, by nature, time sensitive, logically the slides should be attached to posts rather than pages or some other type of post. So to begin, we will assume you know how to add and edit a post, if you do not please read the posts tutorial first.
Adding a new promotional slide
- From any screen you may be working on, hover your mouse over the posts menu item on the left then select Add New from the menu items that appear.
- Create a post about your promotion as you would normally. Talk about who, what, when, and where the thing you want to draw attention is about.
- Below the main content area you will see what is known as the dynamic panel. Typically the default panel displayed is the SEO Options panel, but we need to load the promo panel. Here's how:
- In the upper left corner of the panel you will see a drop down menu next to a button that says "Load"
- click on it and select "Promotions"
- click the load button
- The promo panel should load
- In the promo panel there are several fields. Each one does something specific. The only one that is required to make a slide is the promo-image, the rest are optional
- Please note: Each layout we use is different so your specific settings may differ somewhat from what is explained below. Ask Your-Web-Guy for specifics of your website if you see something different
- promo-image - This is the slide image itself. There are two ways to select the image to be used. You only need to use one method, not both.
- The instructions for the field should have the specific pixel dimensions that your website uses for the promo-slider. Make sure the image you use is at least those dimensions. If it is larger, the system will re-size it. Remember it will crop excess from the sides or top and bottom depending on if it is too wide or too tall.
- The choose file button allows you to upload a new image from your hard drive.
- When you click it a file browser dialog will open up.
- Select the image from your hard drive and click open.
- The file will be uploaded to your website and added to the media library.
- The dialog box will disappear and a small thumbnail of the image you chose will appear below the choose file button
- The media picker link allows you to select a file already in your media library.
- Click on it to open a list of images in your media library.
- When you have found the image you want to use click the "Show" link
- In the dialog that appears simply click the "Use This" link next to the words Media Picker
- The dialog box will disappear and a small thumbnail of the image you chose will appear below the choose file button
- promo-link - this is used to create a "Read More" link on the slide
- You can enter a web address such as https://www.your-web-guys.com which will link the Read More text to that web address so when someone clicks on it they are taken to that web page.
- You can simply type the word "self" in this field to make the read more link go to the post you have created above.
- You can leave it blank and have no Read More text at all on this particular slide
- promo-float - how the text will be displayed on top of the slide image. Select left, right, or center to have the text aligned in that way.
- promo-text - the text that is displayed on top of the slide next to the Read More button if there is one.
- This field has rich text formatting available which means you can add bold, italic, and other formatting to the text in this field
- Keep it short, typically the text in this field is relatively large similar to a headline in a newspaper so be concise but descriptive to draw users to the read more link
- Once you are happy with the settings and content you have entered, click the blue publish button on the upper right to make both the post and the slide view-able to your visitors.
Click here to see the tutorial on how to edit an existing slide
If you have any trouble with this process, please send us a support email we are always happy to help.
This tutorial assumes you know how to add slides to your promo slider. If you do not please see our tutorial on Adding Slides to Your Promo Slider first
The slides in your promo slider are unlimited and do not expire automatically. Because of this, you will want to remove or edit them at times. Here is how you do so:
To find the posts that have slides associated with them
- Make sure you are logged in to your admin area. Click here if you are not sure how to do this.
- From any screen you may be working on, click the Posts menu item on the left.
- When you click on the posts menu link it will bring up a chronological list of posts that have already been published.
- Beware that this list is paginated so if you have more than 10 posts total some might be on additional admin pages
- You can navigate through at the top or bottom of the list on the right side.
- You can also use the search form on the upper right to find the post you are needing to edit.
- On the left of the list of posts there is a column titled Promo Slider, a green checkmark will be next to the title of any posts that have slides associated with them.
To edit a slide
- To edit any of the existing slides simply click on the title of the post next to the green checkmark to bring up the edit post page.
- Scroll to the Promotions panel below the main content area.
- If you do not see the promotions panel, click the drop down menu on the upper left corner of the panel directly below the main content area
- Select Promotions and click the load button
- Make any edits to the fields you need
- Click the blue update button in the upper right corner to commit the edits
To delete a slide
Because we do not want to ever delete a post completely as search engines may be sending traffic to it, you only want to delete the slide. To do this you only need to delete the slide associated with the post, not the post itself.
- Simply click on the title of the post next to the green checkmark to bring up the edit post page.
- Scroll to the Promotions panel below the main content area.
- If you do not see the promotions panel, click the drop down menu on the upper left corner of the panel directly below the main content area
- Select Promotions and click the load button
- In the promo-image field, click the checkbox next to the thumbnail of the slide image.
- Click the blue update button in the upper right corner and the slide will be removed, but the post will remain.
If you have any trouble with this process, please send us a support email we are always happy to help.
Once you have created your web page or your blog post in our CMS it is time to optimize it for search engine traffic. If you have already determined what keyword/phrase you want to focus on then you are ready to use this tutorial. If you have not, please click on the links in the previous statements to get caught up then come back here.
The thing to remember overall is that google (and all search engines) like repetition, but not copy and pasting. This is referred to as keyword density. There are lots of different opinions on what specific percentage you should use, but none are considered best practices and there is lots of debate as to which is the correct number. We believe that when there is no consensus, you should use a rule of thumb.
The best rule of thumb would be to phrase your content in a way that might seem odd when read. In other words, if you read your content and you think to yourself "if i hear dallas dentist office one more time i am going to loose my mind", then you are using it too often. If you read your content and you don't notice the keywords at all, then you are using it too little. If you read your content and you think to yourself "that is an odd way to write that" then odds are it is perfect.
In addition to that rule of thumb you also have the opportunity to add some keyword density through media on the page and the metadata contained within. Below is how our system allows you to manipulate the metadata throughout your site with a simple recipe.
In the SEO Options panel, just below the main content area of the edit post/page dialog on your administrative back end enter the following:
- in the first field, enter the keyword or phrase that you are targeting for this update. Click here for help on how to determine which keyword/phrase to use
i.e. Dallas dentist office - h1 field - write a sentence with the keyword or phrase in it.
i.e. Dentists office in the Dallas Area - Description field - write another sentence with the keyword/phrase in it again, but rearranged this time.
i.e. Great Dentist in an office in dallas - keywords field - this field is not really needed anymore. Most search engines dont look at this meta tag because it was so badly abused in the past. However, that could change at any moment so it is not a bad idea to use it. It just probably wont make a difference any time soon.
- seoblockquote field - Here you should enter a paragraph with your keyword/phrase in it a couple of times. Remember to rearrange the words to make them different than before, but just a couple of sentences should do the trick
Once you have all that in place, your content is ready to be published. Now all you need to do is figure out when publication would work best, here is what we suggest.
Before you even start writing a web page or your blog post in our CMS, you need to determine which keyphrase or keyword you want to focus on for search engine traffic. Once you have determined your keyword/phrase, you can create your page or post as normal, then optimize the content and the media to match. Here is how to determine which keyword or phrase you should use:
Option 1, ask google
One of the great things is that if you want to know how to get more attention from google, you just have to google it. They will tell you everything you need to know to get traffic from them. One of the greatest tools they provide is the keyword suggestion tool in google adwords. You will need an adwords account, but creating one is easy and free. Even though they will try to convince you to purchase pay per click packages, we advise you not to. Just use the tool instead.
- login to adwords by clicking the link above
- if you don't get to the keyword planner tool initially, click on tools in the navigation bar and select keyword planner from the drop down menu
- under [Find new keywords and get search volume data] click on the first option titled "Search for new keywords using a phrase, website or category"
- this will open up a form where you can enter different information. These fields are pretty self explanatory and have help icons you can click on for more detailed information so we will not go over them all here. Fill out the form with what you want to determine and click [get ideas]
- The new page will show lots of different options and ways to drill down to find the information you want, but if it gets overwhelming, just let us know and we will walk you through it.
- The important thing to look at is the keyword ideas table in the middle of the page. The table is like a spreadsheet with the following columns:
- keyword
- ave. monthly searches
- competition
- suggested bid
- ad impr. share
- add to campaign
- the first three columns are what you are after. Find a keyword that is high in monthly searches, but low in competition. That is the keyword you want to use for your content.
They change this tool quite a bit so these instructions might not be correct when you read them. If that is the case, let us know in a support ticket and we will walk you through it personally.
Option 2, ask google... in a different way
All of the sites we build include google analytics tracking. You can use this tool to find what keywords your site is getting traffic from as a starting point before using the adwords tool above. You should also use this tool to see what results your efforts have brought so you can adjust your focus accordingly in the future. Again, this tool is very robust and powerful to the point that it is hard to handle if you aren't used to working with it. We are, so don't hesitate to ask us to help you navigate the use to get the information you need.
- login to analytics here
- click on the all website data link under your company name (if you don't see statistics initially)
- in the left menu, click aquisition, then search console, then queries
- this will show you what keyphrase was used to find your site in the time period you indicated.
The first row is always going to be (not set) because as privacy concerns have increased, there are instances where google will simply not log what keyphrase was used to find your site. Typically though, that is just an amalgam of the other keywords below so simply ignore it.
Because keyword density is so important to get right (you dont want too much but you also dont want too little) you need to use every opportunity to add keywords without looking spammy. One great way to do that is through media on your post or page. Hopefully you have already reviewed, or are familiar with adding and editing media to your content. In addition to the normal way of adding an image, you want to follow these additional steps to ensure your image(s) are correctly optimized with the keyword you have determined for your update and that you have optimized the update for.
Step one, find an image that matches your content.
Simply doing a search in google images for the keyword you are using and downloading someone else's image to use isn't a great idea, although it probably wont be a big issue if you decide to (we just didn't tell you to do it). The better idea is to find a royalty free stock photography supplier where you can find the image you need and purchase the rights to it pretty inexpensively. We recommend 123rf.com as the smallest image size they provide, which is all you need for this kind of thing, is only about a dollar.
Step two, adding it to your content
The normal process of uploading an image to be used in the update is fine, just dont complete the process until you have finished the next step. Select a spot near the top or even multiple places for additional images if your content is long enough.
Step three, optimizing it to suit your keyword
once you have uploaded the image, make the following modifications in the attachment details panel on the right side of your screen:
- Title: Edit this to have your keyphrase/word in it. Very few people will see this content, but googlebot certainly will.
i.e. Dental Waiting Room in our Dallas Office - Caption: This will show up under the image on the web page you are creating. Keep it readable, but try to include the keyphrase again in another order
i.e. View of our Dallas office waiting room in our dental practice. - Alt Text: This is for things that don't have sight. I say things, because googlebot and other search engine robots can't see. All they can do is gather data and a bunch of pixels don't look like a picture to a robot... they are just a bunch of pixels. So the alt tag is a great place to add another instance of keywords into your update. Just another sentence with the phrase in it rearranged just like before. This one can be seen by people, but not as obviously as the caption.
i.e. Image of dallas dentist office waiting room
Now, insert the image just like you would normally.
Because search engines need your content more than anything else, the various algorithms that they use all have one thing in common... they all want new content added on an ongoing basis. To make sure you provide the content they want in a routine fashion we suggest two things;
#1 create an editorial calendar
Having a plan to target specific keywords/phrases on a regular basis is key. Using one of the templates below, you can create an editorial calendar that will help keep your plan organized and on target. Your editorial calendar should include simple information about each of these projects:
- Title or description of the content
- Links to supporting documents, like content briefs
- Author or writer
- Deadline
- Channels you will promote it on (don't forget, search engine optimization goes hand in glove with social media)
The following is a very basic template of an editorial calendar which we got from this article on the Hootsuite Blog. You should add columns or rows as required.
#2 Pre Post your updates
Using your editorial calendar does not have to be a day to day thing. You can create it, then schedule the updates you write to be published automatically on a future date through your website. If you have opted to have our social media setup done as well, then your social media platforms will also get the update over time. Here is how you do it:
- Create and optimize a blog post as usual, but dont click on the blue publish button
- just above the blue publish button you will see a calendar icon with the words [Publish immediately] and an edit link next to it. Click on the edit link
- this will reveal date and time fields that you can edit to your liking. Set the date into the future and click okay
- that will change the publish button into a schedule button. Click on it and your post will go out automatically at the time and date you specified.
You can create and schedule your entire month, quarter or even year of updates all at one time using this technique. Then you simply do what you do best... build your business while your website published updates to get the search engines attention.
Some (and soon all) sites that Your-Web-Guys host have much of their content served through a CDN. CDN stands for Content Delivery Network. From the cloudflare website
A content delivery network (CDN) refers to a geographically distributed group of servers which work together to provide fast delivery of Internet content.
A CDN allows for the quick transfer of assets needed for loading Internet content including HTML pages, javascript files, stylesheets, images, and videos. The popularity of CDN services continues to grow, and today the majority of web traffic is served through CDNs, including traffic from major sites like Facebook, Netflix, and Amazon.
If you have ever wondered why websites like Facebook and Amazon load so quickly, its because they have much more money than you 🙂 But also because they use CDN's and now Your-Web-Guys Clients do too... at no additional charge.
Only problem is that a Cache of your website is saved on the CDN so that it can be delivered quickly. That means that if you make an update to your website, and the cache is not updated at the same time, then you wont see those changes right away.
We have a solution for this.
 There is a plugin that we use that integrates with Cloudflare's API that automatically updates the cache whenever you update your website. If you see the information shown in the screenshot to the right then your website has been updated with this fix and it should be working automatically. You can see this screen in your website admin area by clicking on Settings > Cloudflare as indicated by the purple arrows.
If you are still not seeing the updates you make then there is a possibility that the API is having trouble at that specific moment. Odds are it will pass and in a few hours you will see the updates. If that is not soon enough, send us a support request by logging into your Client Control Panel or simply sending an email to support@your-web-guys.com and we will manually clear the cache for you
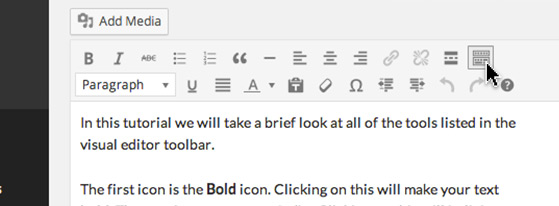
This tutorial assumes you are familiar with adding and editing both posts and pages. If you have not already done so, please make sure you have read and understand both the adding and editing pages as well as adding and editing posts tutorials as the information contained here is applicable to both functions.
The text editor has one line of icons visible by default. This line typically has all the formatting options you will typically need. However, there are times when you need additional formatting options such as different font color or indenting options. To toggle visibility of those buttons, you will need to activate the advanced text editing icons row. Click on the icon which looks like a bunch of buttons in boxes at the end of the row of icons you see. It should look something like the image below:
Make Us Your-Web-Guys Today
 Step 1: Tell us about your business
My company...
